
 영어
영어 中文简体
中文简体 Русский
 Español
 Português
 Türkçe
 العربية
 Deutsch
 Polski
 Italiano
 Français
 한국어
한국어 ไทย
ไทย Tiếng Việt
 日本語
日本語





























플러그 핀 절연 슬리브의 마모 시험 장치
사용자 설명서
적용 할 수있는 LISUN 모델: LS-B10
1. 장비에 대한 기본 이해
1.1 주요 매개변수
1.1.1 장비 기술 사양
| 파라미터 | 주의 사항 |
| 워크 스테이션 | 단일 스테이션 |
| 마찰 빈도 | 30 times per minute; each forward and backward movement counts as one |
| 무게 | 4N |
| 근무 일정 | 9 mm, with approximately 7 mm of friction-resistant insulation sheath |
| Scraping Wire | Φ1 mm, effective length 6 mm |
1.1.2 적용 가능한 표준
The LS-B10 Apparatus for Abrasion Test on Insulating Sleeves of Plug Pins is designed and manufactured in strict accordance with Clause 24.8 and Figure 28 of GB/T 2099.1, “Plugs and Sockets for Household and Similar Purposes—Part 1: General Requirements” (IEC 60884-1:2022, Clause 23.2, Figure 31).
It is primarily used in electrical product quality inspection laboratories, the quality control departments of manufacturers of plugs, sockets, and electrical accessories, third-party testing organizations, and for import and export product inspections.
1.2 장비 구성 검증
1.2.1 포장 풀기
기기를 개봉할 때는 날카로운 도구로 외부 케이스에 흠집이 생기지 않도록 조심스럽게 다루십시오. 개봉 후에는 먼저 기기 외관을 검사하여 눈에 띄는 변형이나 찌그러짐이 없는지, 버튼이 손상되었거나 헐거워지지 않았는지 확인하십시오. 기기 또는 부속품에 이상이 발견되면 전원을 켜지 마시고 즉시 저희에게 연락해 주십시오.
1.2.2 본체 및 부속품
| 번호 | 주의 사항 |
| ① | LS-B10 본체 |
| ② | 전원 코드 |
| ③ | 2 spare U-shaped steel wires |
1.2.3 Download Electronic Documents
전자 사용자 설명서, 교정 인증서, 보증서 및 기타 문서의 다운로드 링크는 제품 발송 시 이메일로 이미 보내드렸습니다. 즉시 다운로드해 주시기 바랍니다. 만약 이메일을 받지 못하셨다면, 저희에게 연락하여 다운로드 링크를 다시 요청해 주십시오.
2. 안전상의 주의
2.1 전기 안전
전원 코드를 연결하기 전에 공급 전압이 AC 220V ±10%이고 주파수가 50Hz 또는 60Hz인지 확인하십시오. 접지 보호 기능이 있는 3구 콘센트를 사용해야 하며, 접지 보호 저항은 4Ω 이하여야 합니다. 접지 보호선을 자르거나 분리하면 감전 위험이 있으므로 절대 하지 마십시오.
2.2 환경 안전
Do not use this equipment in environments with flammable or explosive substances, strong electromagnetic interference, high temperatures and humidity, or excessive dust levels. Place the equipment on a level, stable surface, leaving at least 0.5 m of operating space around it. Operating environment: temperature 5°C to 35°C, humidity ≤65% RH.
2.3 운영 절차
During the test loading process, do not reach into the area of the clamps or the motor drive mechanism to prevent pinching injuries; test specimens must be securely clamped, as specimens falling out or weights dropping during the test may damage the equipment; it is strictly prohibited to disassemble the equipment’s drive mechanism or replace weights with non-original ones.
3. 장비개요
3.1 표준 다이어그램
그림 3-1를 참조하세요.
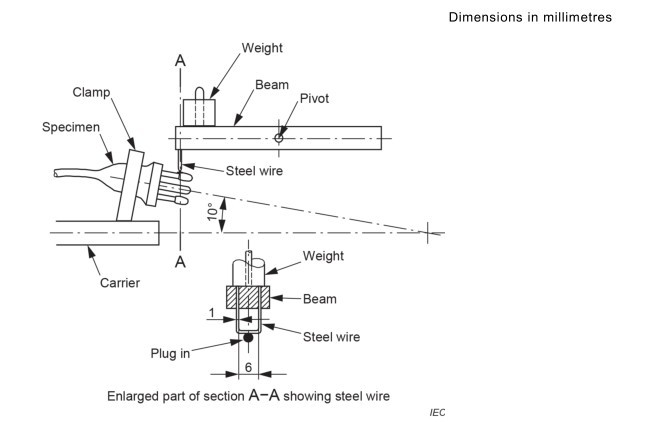
그림 3-1
3.2개의 제품 사진
그림 3-2를 참조하세요.
| 번호 | 주의 사항 |
| ① | 전원 스위치 |
| ② | 퓨즈 |
| ③ | Start Test Button |
| ④ | Stop Test Button |
| ⑤ | 리셋 버튼 |
| ⑥ | Counter: The top line displays the current number of tests, and the bottom line displays the set number of tests. |
| ⑦ | Motor drive rod and sensor: each full rotation is counted twice—once for each leg of the round trip. |
| ⑧ | Fixture for mounting the test specimen connector |
| ⑨ | Weight, 4 N |
| ⑩ | 강선 |
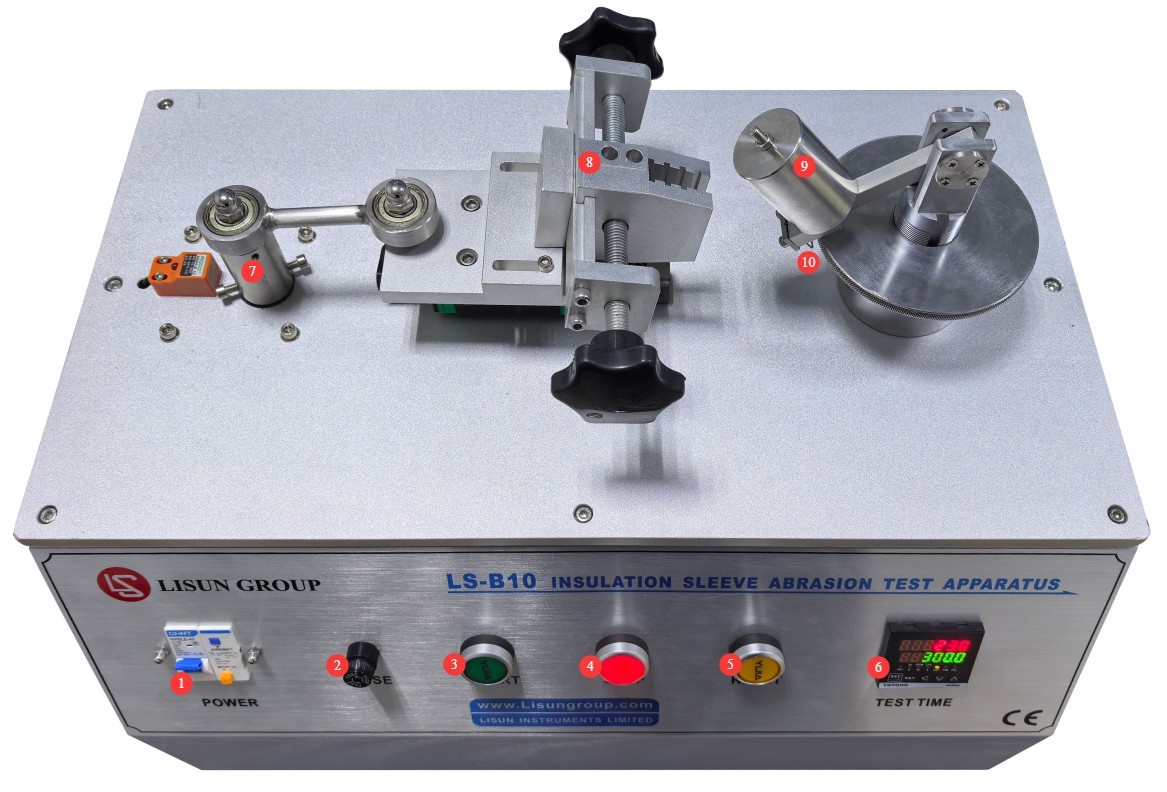
그림 3-2
4. Wear Resistance Test for Plug Insulation Sleeves
4.1 샘플 준비
Select finished plugs that are intact, undamaged, and have not undergone aging tests. The test must be conducted on one prong of each test specimen.
4.2 Sample Installation and Commissioning
Refer to the standard diagram in Section 3.1 to install the test specimen. Press the “Start Test” button to begin the test, observe the wire’s friction travel, and adjust the position of the connector so that approximately 7 mm of the 9 mm wire travel is covered by the insulating sleeve. Once adjusted, press the “Stop Test” button, then press the “Reset” button to clear the count.
4.3 Set Parameters and Start the Test
| 명령 | 주의 사항 |
| ① | Press the counter setting button, then use the up and down buttons and the directional buttons to change the number of settings; according to the standard, the number of tests must be set to 20000. |
| ② | Press the Reset button to clear the current test data. |
| ③ | Press the “Start Test” button to begin the test. |
| ④ | During the test, observe the condition of the specimen and the steel wire. If any abnormalities are detected, press the “Stop Test” button, make the necessary adjustments, and then retry. |
| ⑤ | When the test is complete, the motor stops rotating; check the current test count to confirm that the test has been completed. |
4.4 시험 결과 평가
After testing, the plug should show no damage that could compromise safety or affect future use; in particular, the insulated sheath should not be worn through or wrinkled.
5. 장비의 일상적인 유지보수 및 관리
5.1 Daily Maintenance After Shutdown
At the end of each day’s testing, clean dust and specimen debris from the equipment surfaces, and keep the clamps and slide rails clean and free of debris; check the steel wire for looseness or deformation; if it is deformed or damaged, replace it.
5.2 주간 정기 유지보수
Apply a small amount of specialized lubricating grease to the equipment’s guide rails, drive screws, and bearings to ensure smooth, jam-free operation.
5.3 Maintenance During Long-Term Storage
After powering down and cleaning the equipment, apply rust-preventative oil to important components such as bearings, drive screws, clamps, and weights to prevent rust and deformation. Cover the entire unit with a dust cover and store it in a dry, well-ventilated warehouse. Power on the equipment for 30 minutes each month to prevent moisture damage to the components.
5.4 교정 주기 요구사항
측정 정확도와 장비의 작동 신뢰성을 보장하기 위해, 자격을 갖춘 제3자 계측 연구소에 정기적으로 보내 교정을 받는 것이 좋습니다. 권장 교정 주기는 12개월입니다. 사용자는 사용 빈도, 환경 조건 및 품질 시스템 요구 사항에 따라 구체적인 교정 주기를 결정할 수 있습니다.
6. 문제 해결 및 일반적인 문제 해결 방법
| 결함 증상 | 가능한 원인들 | 순서 |
| The device did not respond after the test was started. | Loose power cord, blown fuse | Check the input power supply and power cord connections; check the fuse on the front panel of the device; if it is blown, replace it with a fuse of the same rating. |