
 영어
영어 中文简体
中文简体 Русский
 Español
 Português
 Türkçe
 العربية
 Deutsch
 Polski
 Italiano
 Français
 한국어
한국어 ไทย
ไทย Tiếng Việt
 日本語
日本語





























광택 측정기
사용자 설명서
적용 할 수있는 LISUN models: AGM-500、AGM-580
1. 제품 개봉 및 기본 사용법 익히기
1.1 주요 기술 사양
| 사양/모델 번호 | AGM-580 | AGM-500 | AGM-500PRO |
| 제품명 | Three-Angle Gloss Meter | Single-angle Gloss Meter | |
| 각도 측정 | 20 °, 60 °, 85 ° | 60 ° | |
| 측정 범위 | 20°: 0–2000 GU | N/A | |
| 60°: 0–1000 GU | 60°: 0–1200 GU | ||
| 85°: 0–160 GU | N/A | ||
1.2 개봉 및 내용물 확인
1.2.1 포장 해제 및 육안 검사
When unpacking the device, handle it gently to avoid scratching the outer casing with sharp tools. After unboxing, first inspect the exterior of the device to ensure there is no visible deformation or dents, and that the buttons are not damaged or loose. If you notice any abnormalities with the device or its accessories, please contact us immediately.
1.2.2 본체 및 부속품
| 번호 | 주의 사항 |
| ① | AGM-500/580 main unit; the calibration baseplate is attached to the measurement window on the bottom of the main unit |
| ② | 충전기 |
| ③ | USB 케이블 |
| ④ | 퀵 스타트 가이드 |
| ⑤ | 천 청소 |
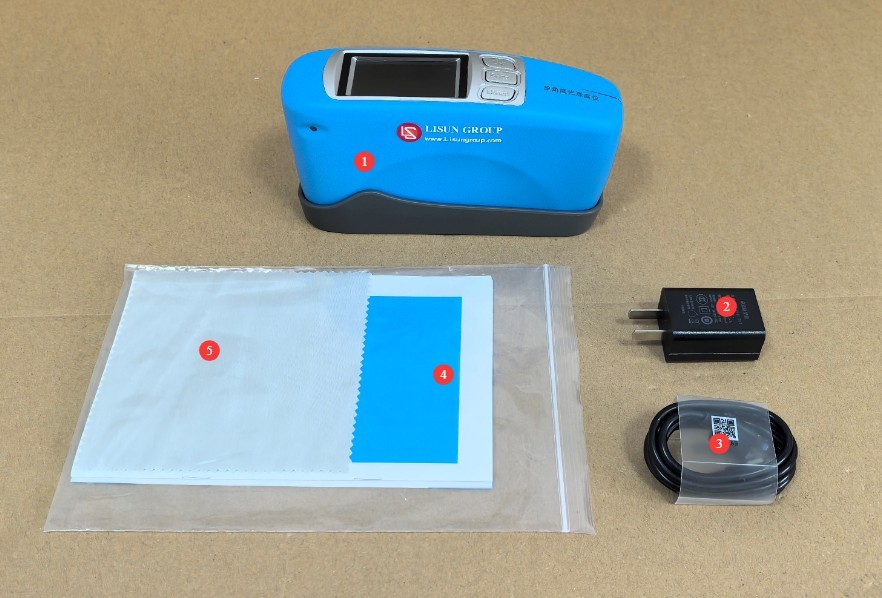
그림 1
디지털 사용자 설명서, 소프트웨어, 보증 카드 및 기타 자료의 다운로드 링크가 이메일로 발송되었습니다. 가능한 한 빨리 다운로드해 주시기 바랍니다. 이메일을 받지 못하신 경우, 저희에게 연락하여 다운로드 링크를 다시 요청하실 수 있습니다.
1.3 Equipment Overview
1.3.1 기기 전면
| 번호 | 주의 사항 |
| ① | 주인 |
| ② | 디스플레이 |
| ③ | ENTER key |
| ④ | Arrow keys: Up |
| ⑤ | Arrow keys: Down |
| ⑥ | Calibration Base Plate. Note: A protective film is applied to the surface of the calibration base plate at the factory; remove the protective film before use. |
| ⑦ | The calibration data is marked on the calibration base plate. |
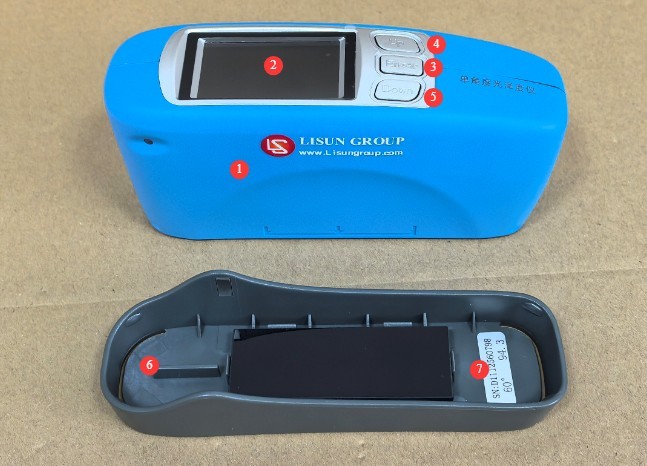
그림 2
1.3.2 Bottom and Sides of the Equipment
| 번호 | 주의 사항 |
| ① | Measurement button. Power on (press briefly when the device is off), power off (press and hold when the device is on), return to the previous menu (press briefly in the parameter settings screen) |
| ② | Measurement Window |
| ③ | USB 포트 |
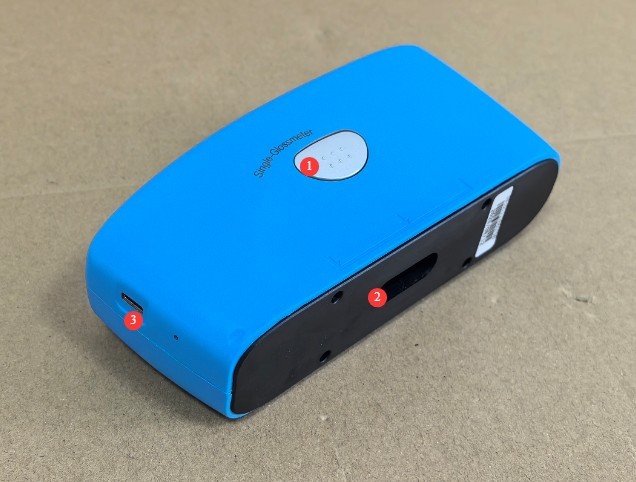
그림 3
2. 사용상의 주의
2.1 작동 전 주의사항
2.1.1 환경 준비
Before measurement, allow the device and the sample to be measured to rest in the same environment for at least 30 minutes to ensure their temperatures are consistent. The measurement environment must be free from direct bright light and stray light interference. Avoid operating in environments with high temperatures, high humidity, or excessive dust. The ambient temperature should be maintained between 10°C and 35°C, with relative humidity ≤80%(no condensation).
2.1.2 샘플 준비
The surface of the sample being tested must be flat, clean, free of stains, and free of scratches. For powder or liquid samples, use a dedicated sample dish to ensure the sample completely covers the measurement window without any gaps. For irregularly shaped samples, ensure that the measurement probe fits snugly against the measurement area of the sample to prevent light leakage.
2.1.3 장비 점검
Before turning on the device, check the measurement window for dust or smudges and ensure that the buttons and ports are functioning properly. After turning on the device, check that the battery is sufficiently charged (if the battery is low, charge it first to avoid a power outage during measurement).
2.2 사용상의 주의
2.2.1 측정 절차
When taking a measurement, place the device’s measurement window directly against the sample’s surface, ensuring it is level and that no light leaks in. After pressing the device’s button, keep the device still until the measurement is complete (1 second); do not move the device during the measurement process. It is recommended to take 3–5 measurements of the same sample and use the average as the final result to minimize measurement errors.
2.2.2 장비 사용 금기 사항
Do not touch the optical components inside the measurement window with your hands, and do not point the measurement window toward a strong light source. Since this is a handheld device, do not drop, bump, or crush it, and avoid exposing the body to water or other liquids.
2.3 안전 경고
Do not attempt to disassemble or replace any internal parts of the device. If the device malfunctions, contact official customer service or an authorized dealer for assistance. Unauthorized disassembly will void the warranty;
If any liquid, dust, or other foreign matter enters the device, immediately turn off the power, disconnect the charging cable, and contact customer service right away. Do not continue to use the device;
배터리 팽창 및 기기 부품 손상을 방지하기 위해 기기를 열원, 화염 또는 고온 환경 근처에 두지 마십시오.
3. 장비 작동
3.1 Power-On Calibration
| 명령 | 주의 사항 |
| ① | First, peel off the protective film from the calibration plate, and then reattach the calibration plate to the measurement window. |
| ② | Press the measurement button briefly to turn on the device; the screen will automatically display a message indicating that the device needs to be calibrated. |
| ③ | Follow the prompts and press the measurement button to calibrate. Once the calibration is successful, the device will enter the measurement screen (pressing the ENTER button will cancel calibration and take you directly to the measurement screen). Note: The default measurement mode at the factory is Simple Mode. |
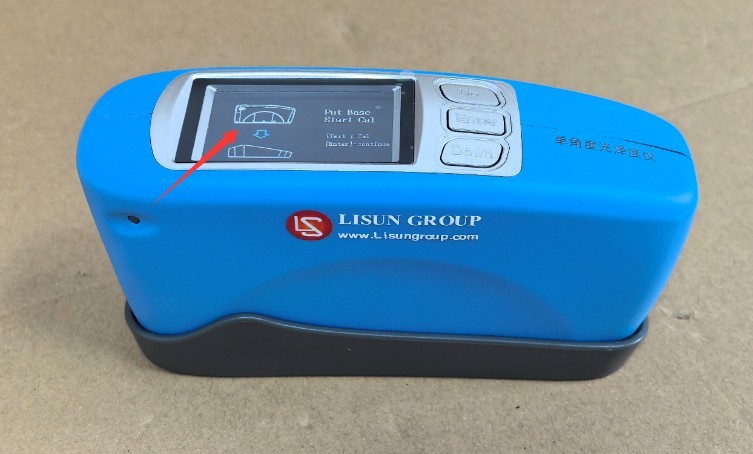
그림 4
3.2 Measurement of the Reference Base Plate
| 명령 | 주의 사항 |
| ① | Make sure the calibration plate is still attached to the measurement window. |
| ② | Press the measurement button briefly to take a measurement. |
| ③ | Check the measurement results; if they match the calibration data marked on the calibration plate, the device’s measurement function is operating normally. Note: The AGM-500 measures single-angle gloss, while the AGM-580 measures three-angle gloss. |
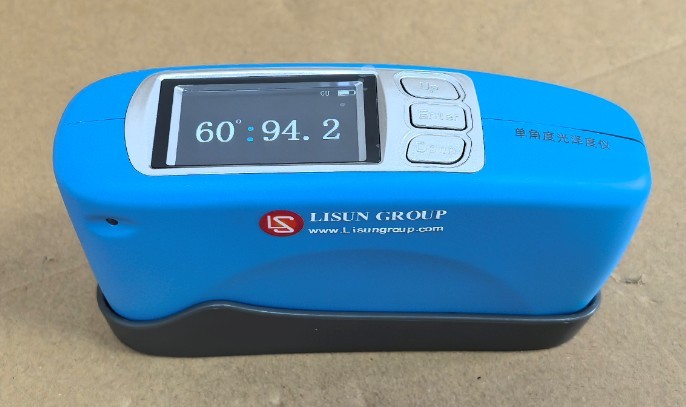
그림 5
3.3 시료 측정
| 명령 | 주의 사항 |
| ① | Remove the calibration baseplate from the measurement window. |
| ② | Place the device’s measurement window directly against the sample surface; ensure that the sample completely fills the measurement window. |
| ③ | Press the measurement button briefly to take a measurement. |
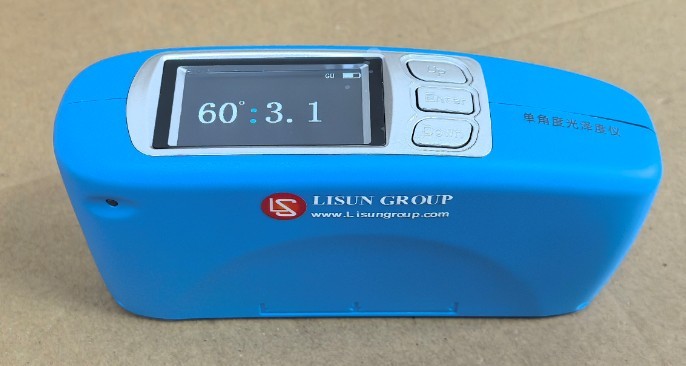
그림 6
3.4 Measurement of Reference Standards and Samples
3.4.1 Change the measurement mode to “Statistics”
Following the instructions in Section 3.5, set the measurement mode to “Statistics” and return to the measurement screen.
3.4.2 기준 표준물질의 측정
Press the measurement button briefly to measure the standard sample data.
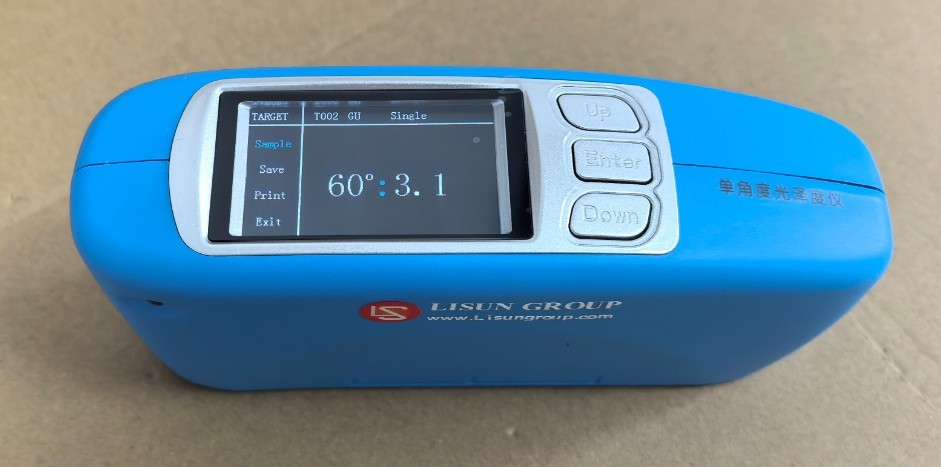
그림 7
Use the up and down arrow keys to select “Save,” then press the ENTER key to save the standard sample data.
3.4.3 시료 측정
Then use the up and down arrow keys to switch back to the reference sample measurement, and press the ENTER key to enter the sample measurement screen. Press the measurement key briefly to measure the sample.
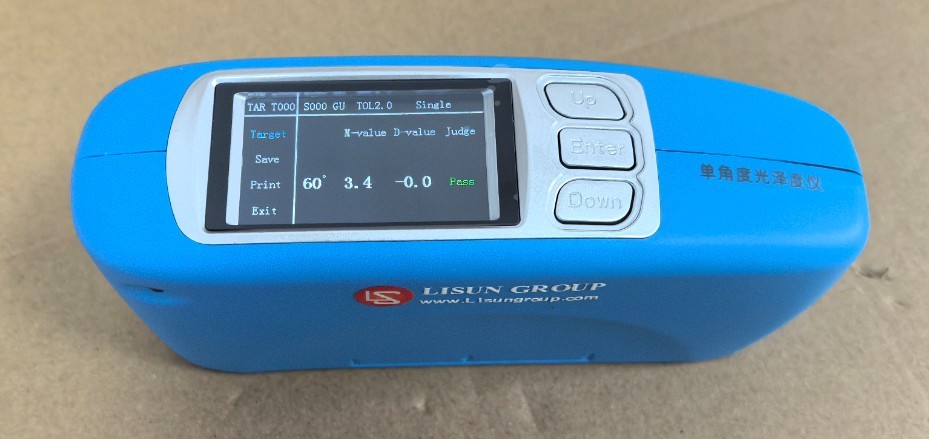
그림 8
The screen displays the sample measurement results, the difference from the reference standard results, and whether the sample passed the test. To save the current sample measurement results, use the up and down arrow keys to navigate to “Save,” then press the ENTER key to save the sample data.
3.4.4 Exiting the Measurement Screen
Use the up and down arrow keys to navigate to “Exit,” then press the ENTER key to exit the measurement screen and enter the parameter settings navigation screen.
3.5 매개변수 설정
3.5.1 Navigation Interface
In Simple Mode, press the ENTER key to access the parameter settings navigation screen. In Statistics Mode, refer to Section 3.4.4 to access the parameter settings navigation screen.
| 번호 | 주의 사항 |
| ① | 측정 인터페이스 |
| ② | 교정 인터페이스 |
| ③ | 데이터보기 |
| ④ | 환경 설정 |
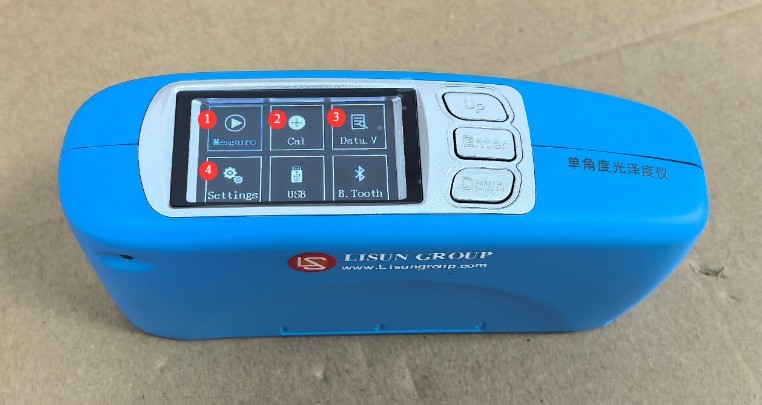
그림 9
Note: Use the up and down arrow keys to make selections, press the ENTER key to enter the submenu, and press the Measure key to return to the previous menu.
3.5.2 Viewing Data
| 번호 | 주의 사항 |
| ① | T represents the stored reference sample |
| ② | S is the number of samples measured under the corresponding standard conditions |
| ③ | Corresponding reference sample data |
| ④ | Press the ENTER key to view the data for all samples measured under this standard sample. |
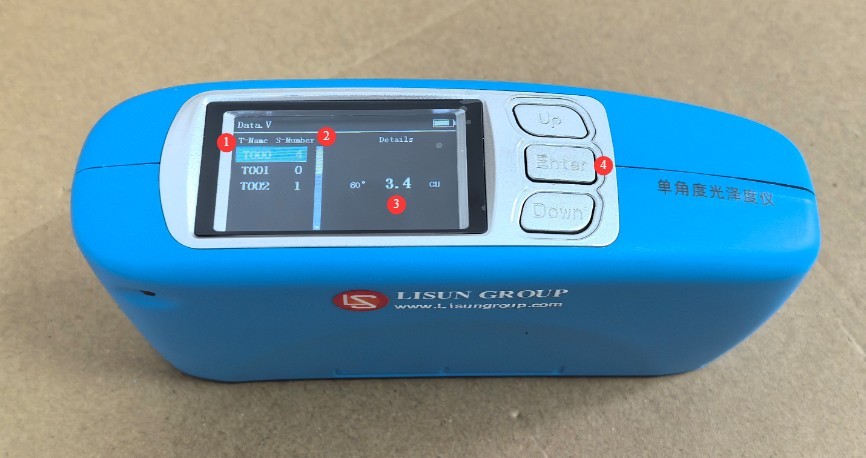
그림 10
Note: For information on measuring and storing data for reference standards and test samples, please refer to Section 3.4.
절대 시스템 설정
| 번호 | 주의 사항 |
| ① | 측정 매개변수 설정 |
| ② | 시간 설정 |
| ③ | Power Settings: You can configure the auto-standby and auto-shutdown times. |
| ④ | 초기 설정 복원 |
| ⑤ | 표시 언어 전환 |
| ⑥ | Device Version Information |
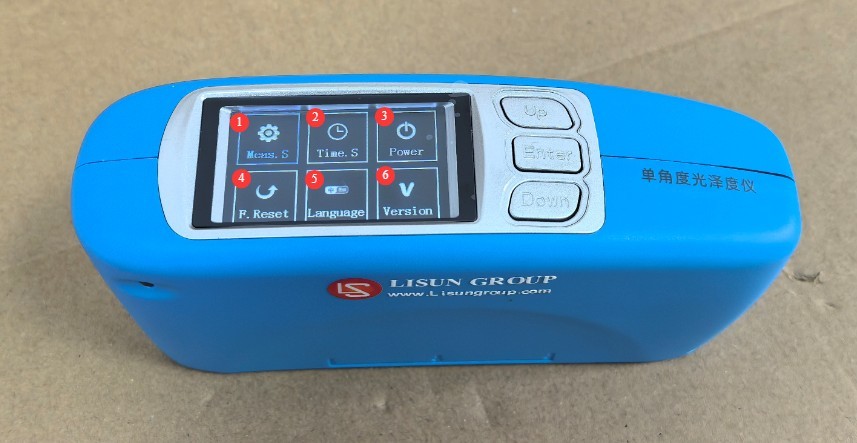
그림 11
Introduction to the Measurement Parameter Settings Interface:
| 번호 | 주의 사항 |
| ① Measurement Mode | The default setting is Simple Mode. You can switch to Statistical Mode to measure reference standards and the differences between samples and reference standards. |
| ② Average number of times | The factory default is 1 time; the higher the average number of times, the longer the measurement takes. |
| ③ Error Range | The factory default is 2, meaning that the test is considered pass if the difference in gloss between the sample and the reference standard is within 2 GU; otherwise, it is considered a fail. |
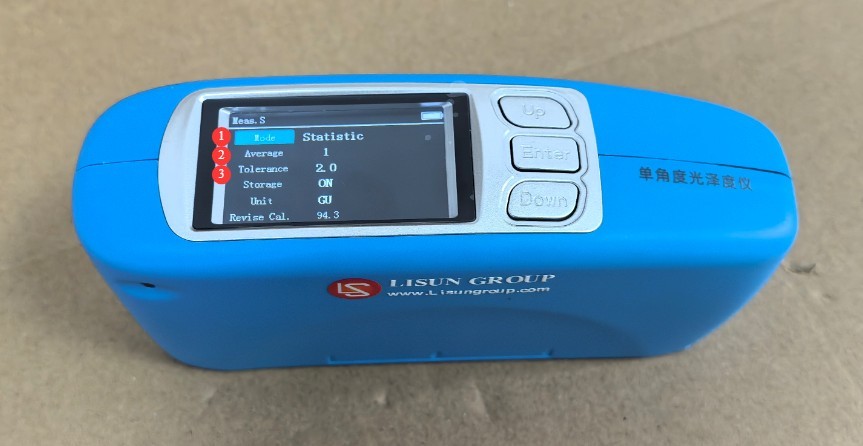
그림 12
4. 장비의 일상 유지보수 및 관리
4.1 청소 및 유지 관리
4.1.1 청소
신체 표면: 깨끗하고 부드러운 천으로 몸의 먼지와 얼룩을 닦아내십시오. 잘 지워지지 않는 얼룩은 소량의 물로 가볍게 닦아내십시오. 세제나 기타 부식성 액체는 사용하지 마십시오.
화면: 화면에 흠집이 생기지 않도록 전용 화면 청소용 천으로 부드럽게 닦아주세요. 손가락으로 화면을 직접 만지지 마세요. 화면에 먼지가 묻으면 보풀 없는 브러시로 살살 털어내세요.
Measurement Window and Calibration Baseplate: Clean with the provided cleaning cloth. If there are stubborn stains, contact us promptly for maintenance. Do not attempt to sand or repair the calibration baseplate yourself.
4.2 배터리 유지 관리
4.2.1 충전 및 유지 관리
Use the device’s standard charger and USB cable. Do not use non-standard fast-charging cables or high-power chargers to avoid damaging the battery. Avoid charging the device in high-temperature environments, and unplug the charging cable immediately after charging is complete to prevent overcharging. Charge the device promptly when the battery level falls below 15% to avoid deep discharge of the lithium battery, which can shorten its service life.
4.2.2 배터리 수명 관리
The device’s built-in lithium battery is rechargeable; under normal use, a single charge allows for 10000 consecutive measurements;
When the device is not in use for an extended period, ensure that the battery charge remains between 50% and 80%. Recharge the battery once every three months to restore the charge to between 50% and 80%, thereby preventing the battery from discharging completely or swelling;
배터리가 부풀어 오르거나, 누액이 발생하거나, 배터리 수명이 현저히 감소하는 징후가 보이면 즉시 사용을 중단하고 수리를 위해 당사에 연락하십시오.
5. 문제 해결 및 일반적인 문제 해결 방법
| 결함 증상 | 가능한 원인들 | 순서 |
| 전원이 켜지지 않음 | 배터리 낮음 | 기기를 충전할 때는 전용 USB 케이블을 사용해 주십시오. 충전 후에도 전원이 켜지지 않으면 수리를 위해 저희에게 연락해 주십시오. |
| 배터리 수명이 저하되었습니다. | 배터리 성능 저하, 과도한 주변 온도 | 서비스 관련 문의는 당사로 연락주십시오. 고온 환경에서 사용 시 배터리 소모가 빨라지므로 일반적인 환경에서 사용해 주시기 바랍니다. |
| 측정 데이터의 중대한 오류 | The sample is uneven or does not fully cover the measurement window; the calibration plate is contaminated; the measurement window is contaminated | Replace with a suitable sample; clean or replace the calibration plate; clean the measurement window; if there are stubborn stains, contact us for service. |