
 영어
영어 中文简体
中文简体 Русский
 Español
 Português
 Türkçe
 العربية
 Deutsch
 Polski
 Italiano
 Français
 한국어
한국어 ไทย
ไทย Tiếng Việt
 日本語
日本語





























LED 광학 시효 시험 장비
사용자 설명서
적용 할 수있는 LISUN 모델: LEDLM-80PL,LEDLM-84PL
1. 제품 개봉 및 기본 사용법 익히기
1.1 Unboxing and Inspection
When unpacking the device, handle it gently to avoid scratching the casing with sharp objects. After unpacking, first inspect the exterior of the device to ensure there is no visible deformation or dents, and that the buttons are not damaged or loose. If you notice any abnormalities with the device or its accessories, do not turn it on. Please contact us immediately.
1.2 System Configuration and Overview
1.2.1 Core Hardware Components
Note: The table below lists the core hardware components of the entire system. The equipment you purchased may include only some of these components; please keep this in mind when following the instructions in this manual.
| 구성 요소 이름 | 모델 | 핵심 기능 |
| MV103 Environmental Test Chamber | GW (or GDJW, GDJS) | Can communicate with software and provide a standards-compliant test environment for temperature (and humidity) |
| High-Precision CCD Spectrometer | LMS-9000CG | Used to measure the light and color parameters of test samples |
| 디지털 파워 미터 | LS 시리즈 | Measure electrical parameters such as voltage, current, power, and power factor of the sample |
| 다중 온도 테스터 | TMP Series | Used to monitor the temperature of samples |
| Multi-Channel Power Switching System | CHCP-18 | Can automatically control the on/off status of any sample |
| DC 전원 공급 장치 | DC 시리즈 | Provide a stable DC power supply for DC samples |
| AC 전원 | LSP Series | Provides a stable, pure sine-wave AC power supply for AC samples |
| 내각 | CASE-19 | Used to house a spectrometer, a multichannel power switch system, and a power meter. Includes a power strip, an RS-485 communication module, and other components. |
| 0.5-meter Integrating Sphere Aging Test Setup | / | Includes 8 E27 light sockets |
| LED Tube Aging Test Rig | Includes 8 lamp holders and an Optical Fiber alignment device | |
| LEDLM-80/84PL Software | / | Used to test and record the photometric maintenance factor of LED luminaires and to calculate LED lifetime based on the Arrhenius model |
1.2.2 Software, user manuals, certificates, etc.
At the time of shipment, a download link containing all the documents was sent via email. Please download them as soon as possible. If you missed the email, you can also contact us directly to request a new download link.
Includes the software, user manual, warranty card, factory calibration certificate, and other important documents, as well as other relevant documents.
2. 안전상의 주의
2.1 전기 안전
2.1.1 Power Supply Matching
The environmental test chamber must be connected to a stable three-phase AC power supply of 380 V ±5%, with a frequency of 50 Hz (60 Hz available upon request). It must be powered by a dedicated circuit to avoid sharing the same circuit with high-power equipment and to prevent voltage fluctuations;
All other equipment must be connected to a stable single-phase AC power source of 220 V ±5%, with a frequency of 50 Hz or 60 Hz. A dedicated power circuit must be used to avoid sharing the same circuit with high-power equipment and to prevent voltage fluctuations;
2.1.2 접지 요구 사항
All equipment (racks, High and Low Temperature Chambres) must be reliably grounded, with a ground resistance of ≤4 Ω. The grounding terminal must be connected to the ground wire of the power supply; omitting grounding or making a loose connection is prohibited.
2.2 환경 안전
2.2.1 작업 환경 요구 사항
The equipment must be placed in a well-ventilated indoor environment free of flammable or explosive materials, with an ambient temperature of 15–35°C and relative humidity of ≤65%. Avoid locations exposed to direct sunlight or with high levels of dust;
A clearance of at least 50 cm must be maintained around the cabinet and environmental test chamber for heat dissipation; do not block the ventilation openings.
2.2.2 Sealing of the Test Chamber
During testing, ensure that the door of the High and Low Temperature Chamber is closed;
If a 0.5-meter Integrating Sphere is used, it must remain sealed;
For open-field testing—such as when using a fluorescent lamp aging device or directing an Optical Fiber cable directly at the sample—personnel must not move around frequently or cause changes in lighting within the test area, to avoid affecting measurement accuracy.
2.3 작동 안전
2.3.1 High-Temperature Protection
When the environmental test chamber is in operation, the temperature inside can reach up to 85°C (the actual temperature depends on the settings). Before opening the chamber door, make sure the chamber has stopped heating and wait until the temperature drops below 40°C to avoid burns.
2.3.2 Installing and Replacing Samples
Samples must be securely mounted to prevent them from falling and damaging the equipment or the samples themselves during testing. Heavy samples, such as floodlights, must be secured using custom-made brackets;
When replacing a sample, you must disconnect the LSP/DC power output and the power supply to the CHCP-18 power control system. Do not plug in or unplug the sample leads while the system is powered on to prevent short circuits or electric shock.
2.4 Optical Fiber Operating Procedures
Optical Fiber must not be bent excessively (minimum bend radius ≥ 10 cm). Do not step on or crush the Optical Fiber, as this may cause damage and result in abnormal test results;
When connecting, insert and remove the connector gently to prevent wear on the connector.
2.5 기타
본 설명서에 나와 있지 않은 사항에 대해서는 주의를 기울여 진행하시거나 당사에 문의해 주십시오.
3. System Assembly and Wiring
3.1 System Wiring
A system wiring diagram is affixed to the inside of the rear door of the cabinet. Please connect all relevant cables according to the diagram.
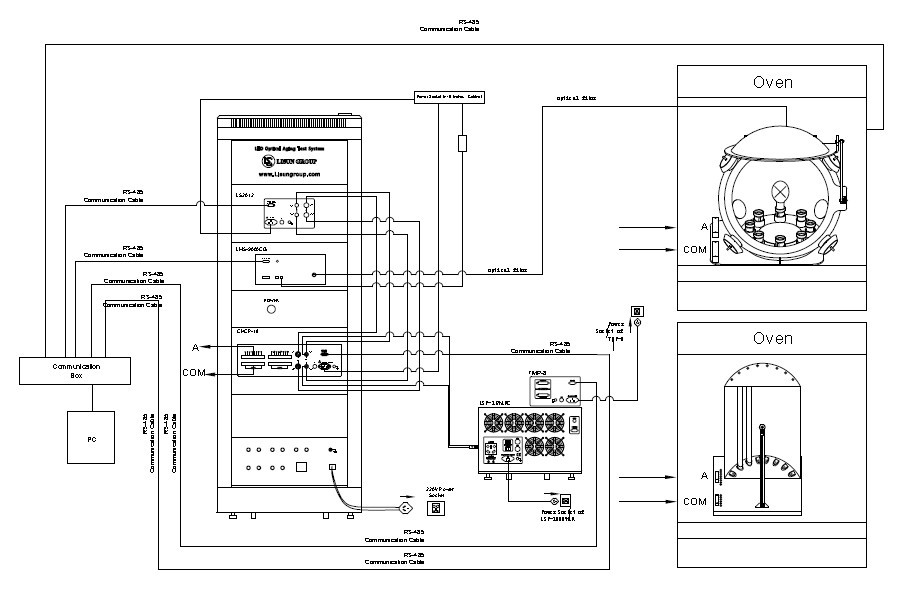
그림 1
To facilitate cable connections between devices, please refer to the figure below for recommended device placement.
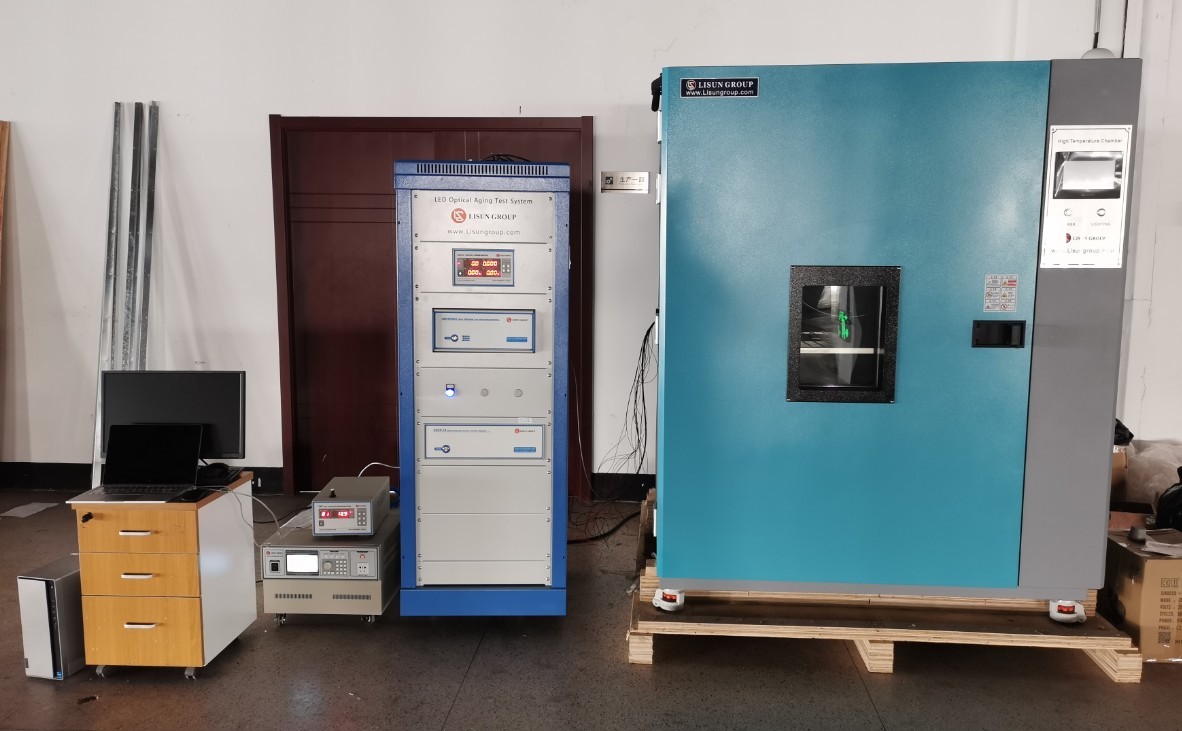
그림 2
3.2 Use of the Aging Apparatus
3.2.1 배치
Please place the aging apparatus securely on the adjustable shelves inside the environmental test chamber. Do not allow any part of the aging apparatus to come into direct contact with the inner walls of the environmental test chamber.
0.5-meter Integrating Sphere aging test apparatus.
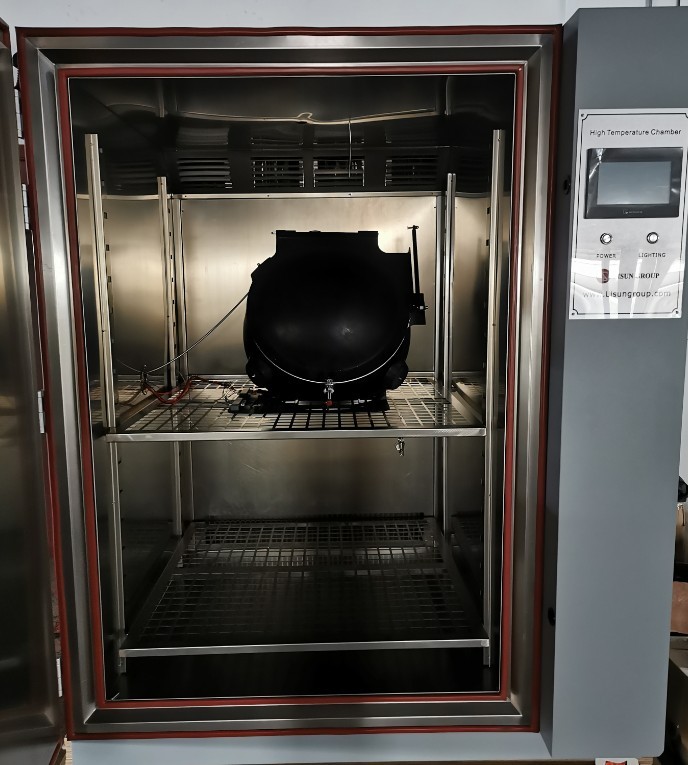
그림 3
LED Tube Aging Test Rig.
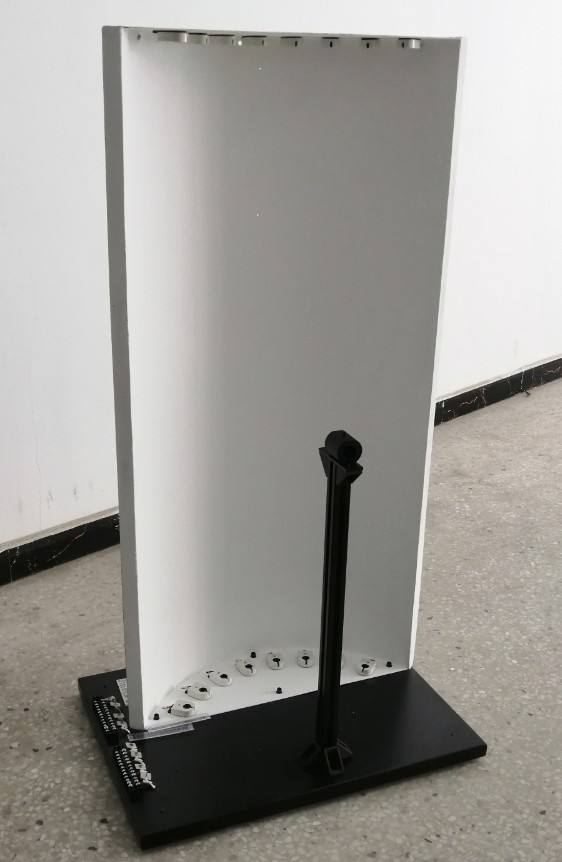
그림 4
If you need to use an aging device other than the one included in our standard configuration, please contact us; the system will need to be retested and recalibrated based on the specific circumstances.
3.2.2 Power Cord Connection
Please refer to the diagram below for the wiring between the aging chamber and the CHCP-18 multi-channel power switch system, which automatically controls the power supply to all samples.
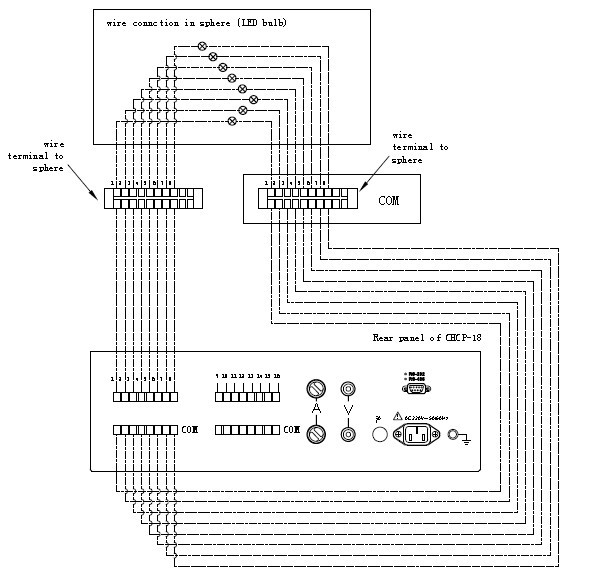
그림 5
3.2.3 Thermocouple Wire Connections
Please refer to the diagram below for the wiring between the aging chamber and the TMP series Multiplex Temperature Tester, which automatically monitors the temperature of all samples.
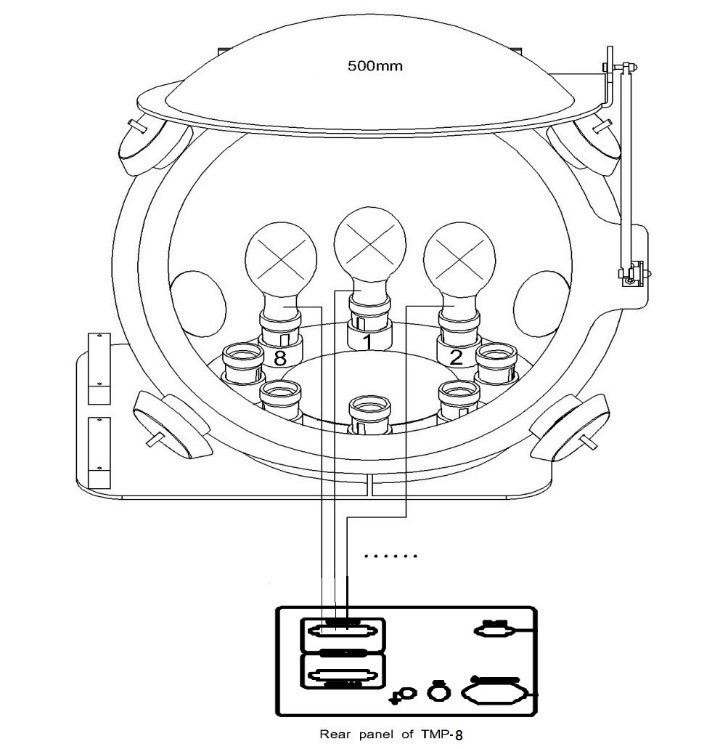
그림 6
You can use a heat-resistant, quick-drying adhesive (such as LOCTITE 402) to attach the thermocouple to the sample measurement point.
3.2.4 Optical Fiber Connections
The Optical Fiber comes with two sleeves, one containing a milky-white insert and one without.
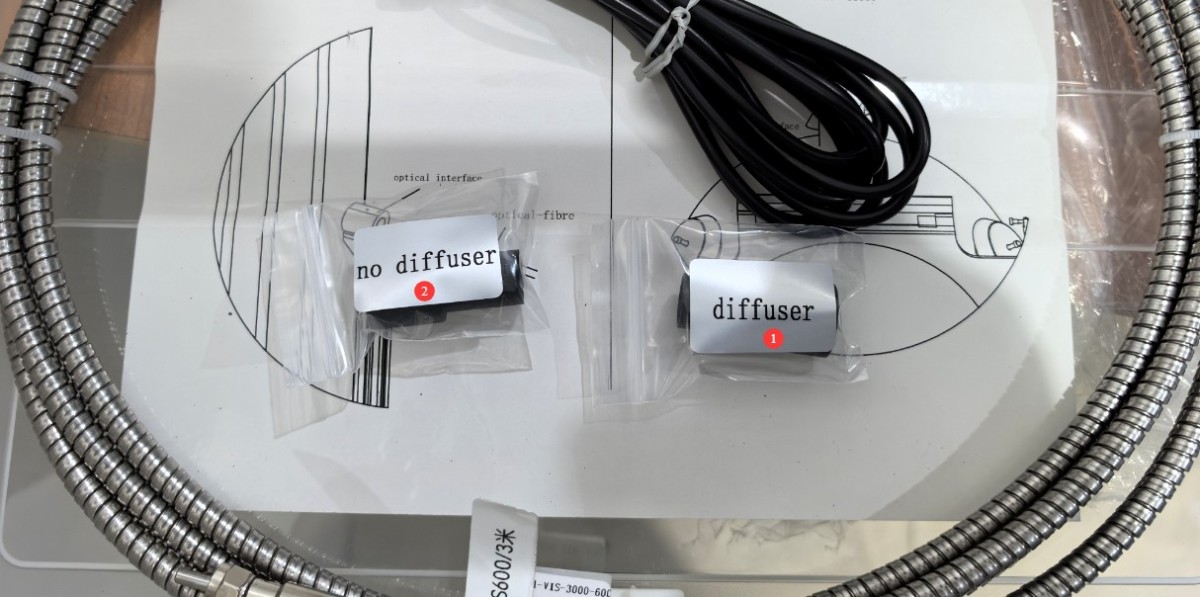
그림 7
| 번호 | 주의 사항 |
| ① Sleeve with milky-white sections | When using a 0.5-meter Integrating Sphere aging test setup, there is a baffle at the front end of the Optical Fiber connector; please use a sleeve with a milky-white insert for the connection. |
| ② Sleeves without milky-white inserts | When using the LED tube aging device, note that a milky white plate is already installed at the top of the Optical Fiber holder; therefore, please use a sleeve without a milky white plate for the connection. |
Once all connections have been made and verified, turn on all devices. Note: To turn on the devices, first turn on the main power switch for the cabinet, and then turn on the power switches for each device one by one.
4. 소프트웨어 설치 및 개요
4.1 소프트웨어 설치
Copy all files to your computer. This software can be installed on the Windows operating system. Double-click to install the software and drivers. Note: Please log in to your computer using an administrator account; otherwise, the software may not function properly.
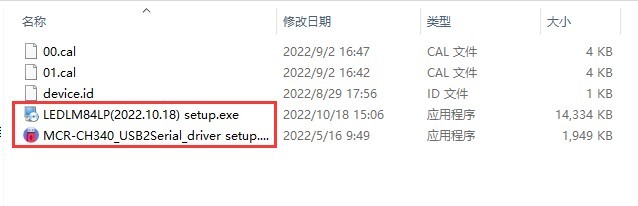
그림 8
After installing the software, there will be two program icons on your desktop. Use the first program (Control Panel) to configure and control the device; the second program is used solely for viewing test reports.
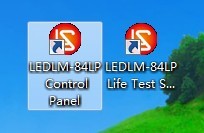
그림 9
4.2 Introduction to and Configuration of the Control Panel
4.2.1 Introduction to the Control Panel
Double-click the first program to open its startup screen.
| 번호 | 주의 사항 |
| ① | Click the red icon in the upper-left corner to switch the interface language between Chinese and English. |
| ② | 환경 설정 |
| ③ | 교정 |
| ④ | To view the test report, open the second program. |
| ⑤ | Lumen maintenance testing; the software’s primary function is to conduct aging and lifespan tests in accordance with the LM-80/LM-84 standards |
| ⑥ | Log testing, non-standard testing, aging test curves showing only parameters versus time |
| ⑦ | During the test, you can click “Pause” or “Resume” to pause or resume the test. |
| ⑧ | During the test, you can click to stop the test. |
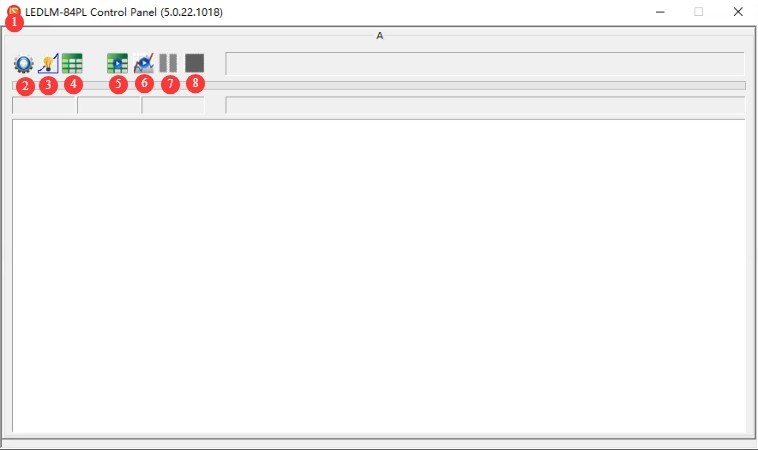
그림 10
절대 시스템 설정
| 번호 | 주의 사항 |
| ① | The models listed in the red box are the standard models. If your system has not been specially customized, simply select the corresponding model. From top to bottom, they are: power meter, spectrometer, Multiplex Temperature Tester, environmental test chamber, and multi-channel power switch system. |
| ② | There is no need to manually modify the serial number, communication port, or communication address; simply click “Auto-Search.” Note: If the software indicates that communication with a device has failed, please check the corresponding communication cable connection and try again. |
| ③ | Permissible Temperature Deviation: Recommended setting is 5°C (i.e., a permissible temperature deviation of 5°C). Time Allowed for the Test Chamber to Adjust Temperature: Recommended setting is 30 minutes (when the program requires the test chamber to adjust the temperature, if the target temperature is not reached within 30 minutes, the program will trigger an alarm and the test will be terminated. Note: The GW test chamber has only a heating function and no cooling function; if cooling is required, the chamber must be opened manually to allow the temperature to drop.) Constant-temperature period: Recommended setting of 3 minutes (i.e., the test chamber must reach the target temperature and maintain it for 3 minutes before proceeding to the next step) |
| ④ | Click to confirm and save the settings |
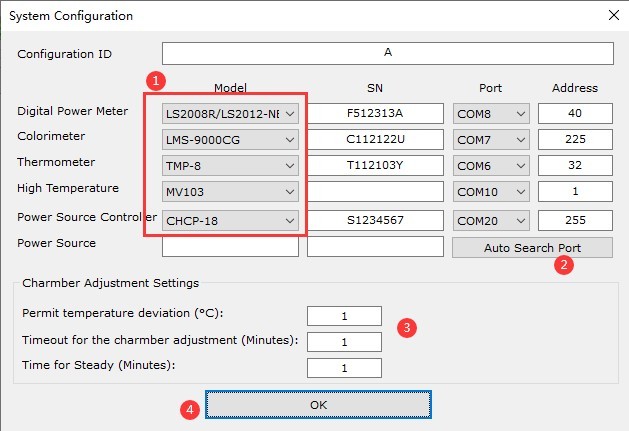
그림 11
4.2.3 보정
Note 1: When using our standard aging test setup (0.5-meter Integrating Sphere aging test setup or LED tube aging test setup), there is no need to calibrate the system, as we have already performed the calibration prior to delivery.
Note 2: If you require a customized aging test chamber to age other types of lighting products, you will need to recalibrate it using a Standard Light Source; otherwise, the test data may be inaccurate. Please contact us.
5. 테스트 절차
5.1 Hardware Preparation
5.1.2 샘플 설치
If you need to conduct a lumen maintenance test, you must select samples of the same model and from the same batch. The samples must be free of visible damage and have consistent performance parameters; the larger the sample size, the more accurate the test results will be.
If you are only conducting log tests, you can install different models of samples into the aging chamber. After the test is complete, an aging test curve will be generated separately for each sample, and there will be no correlation between samples.
Note that prior to the endurance test, the sample must be left at 25°C and 55% RH for 24 hours to eliminate the influence of environmental factors on the test results.
Install all samples in the aging test apparatus, place the aging apparatus securely inside the environmental test chamber as described in Section 3.2.1, and close the chamber door.
5.1.3 전원 출력
If the sample luminaire you are testing is AC-powered, the system comes standard with an LSP Series line-positive, sine-wave AC power supply; if the sample luminaire you are testing is DC-powered, the system comes standard with a DC Series Digital CC and CV DC Power Supply.
As indicated in Section 3.1, the output cables of the LSP Series/DC Series power supplies are connected to the CHCP-18 multi-channel power switch system, which automatically controls the power to the sample lamps via the CHCP-18; all samples are connected in parallel.
Therefore, you must first manually configure the parameters for the LSP Series/DC Series power supplies and start the output.
| 전원 공급 장치 | 행정부 |
| LSP Series | Set the voltage and frequency, then start the output. |
| DC 시리즈 | It must be set to constant-voltage output. Note: Since the number of samples illuminated varies during each phase of the test, it cannot be set to constant-current output. |
Note: For information on operating the LSP Series/DC Series power supplies, please refer to the corresponding user manual.
5.2 Lumen Maintenance Test
5.2.1 테스트 설정
Click the Lumen Maintenance Test icon.
| 번호 | 주의 사항 |
| ① | Select the applicable standard: LM-80 for light sources, LM-84 for luminaires |
| ② | Enter Sample Information |
| ③ | If your Multiplex Temperature Tester is model TMP-8, there will be 8 sample slots here; if your Multiplex Temperature Tester is model TMP-16, there will be 16 sample slots here. Note 1: Please check the boxes next to the slots that contain samples; do not check the boxes next to slots that do not contain samples. Note 2: Our standard aging units all include 16 sample mounting positions; the serial numbers marked on the sample mounting positions correspond one-to-one with the serial numbers displayed in the software. |
| ④ | Enter the aging temperature and the measurement temperature. Aging temperature: The temperature inside the environmental test chamber while the sample is aging. Measurement temperature: The temperature inside the environmental test chamber when measuring the sample’s optical, color, and electrical parameters. |
| ⑤ | Enter the aging temperature and measurement humidity. Aging humidity: The humidity inside the environmental test chamber during sample aging. Measurement humidity: The humidity inside the environmental test chamber when measuring the sample’s optical, color, and electrical parameters. Note: GW and GDJW models of environmental test chambers do not have a humidity function; the software does not execute humidity commands. |
| ⑥ | Set the sampling time. You can enter any numbers, but they must be listed in ascending order. Each number represents a sampling time point in hours, separated by commas. For example, you can set it to: 0, 24, 48168, 500, 1000, 2000, 3000, 4000, 5000, 6000 Note 1: According to the standard, you need to test for 6000 hours, so the last number should be 6000 . Note 2: Regardless of how long you test, the software can simulate test results for 6000 hours. For example, if you only want to test for 1000 hours, you can set it to: 0, 10, 20, 50100, 200500, 1000 |
| ⑦ | Monitoring interval, in hours (h). During the aging test, this interval is used to monitor whether the lamp under test has failed and whether the test equipment is operating normally. It can be set to 1. |
| ⑧ | Stabilization time before testing, in minutes. If the aging temperature is set to 85° and the measurement temperature is set to 25°, the software will automatically control the temperature inside the test chamber to drop from 85° to 25° at each sampling time, and will not begin measurement until the temperature has stabilized for a certain period. It is recommended to set this to 60. |
| ⑨ | Measure the delay time in seconds. During aging, all samples are illuminated simultaneously; however, during measurement, samples are illuminated one at a time. The delay time refers to the duration from when a sample is individually illuminated until the measurement begins. It is typically set to no less than 2 seconds to obtain accurate photometric and electrical parameters. |
| ⑩ | Set the path and filename for saving test results. You can check the box to automatically add a file extension to prevent old test files from being overwritten if you forget to rename them. |
| ⑪ | When selecting an aging test chamber, “Sphere” refers to a 0.5-meter Integrating Sphere aging test chamber, and “Direct” refers to an LED tube aging test chamber. |
| ⑫ | After confirming that all settings are correct, click OK to begin the maintenance test. |
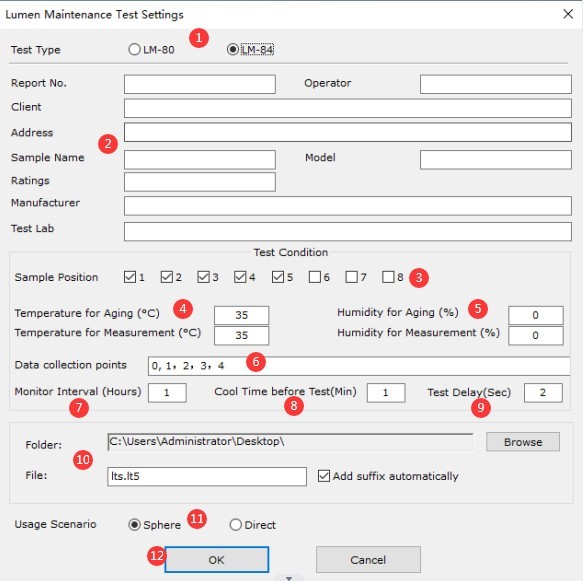
그림 12
5.2.2 Software Monitoring
The software automatically monitors the operating status of all devices and controls the corresponding devices step by step according to the configured parameters to perform aging tests. You can check the prompts on the software interface to see which step the aging test system has reached.
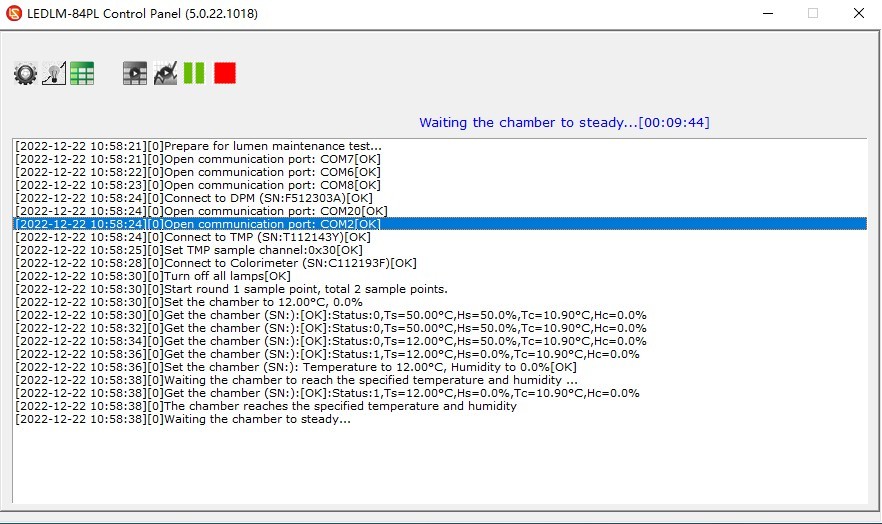
그림 13
Note: If the software encounters an error and cannot continue the test, the test will automatically stop. Please check the prompts on the software interface, resolve the issue, and then restart the test.
5.3 Log Testing
5.3.1 테스트 설정
Click the log test icon.
| 번호 | 주의 사항 |
| ① | Select the parameters you want to record as needed |
| ② | Set the temperature and humidity of the test chamber |
| ③ | Set the total aging duration, such as 1 hour, 10 hours, etc. |
| ④ | Set the measurement interval, such as 5 seconds, 1 minute, etc. We recommend setting the interval to 5 seconds or longer. |
| ⑤ | Please check the installation slots that have samples installed; do not check the installation slots that do not have samples installed. |
| ⑥ | Fill in the information for each sample |
| ⑦ | Set the path and filename for saving test results. You can check the box to automatically add a file extension to prevent overwriting old test files if you forget to rename them. |
| ⑧ | When selecting an aging test chamber, “Sphere” refers to a 0.5-meter Integrating Sphere aging test chamber, and “Direct” refers to an LED tube aging test chamber. |
| ⑨ | After verifying that all settings are correct, click OK to begin the log test. |
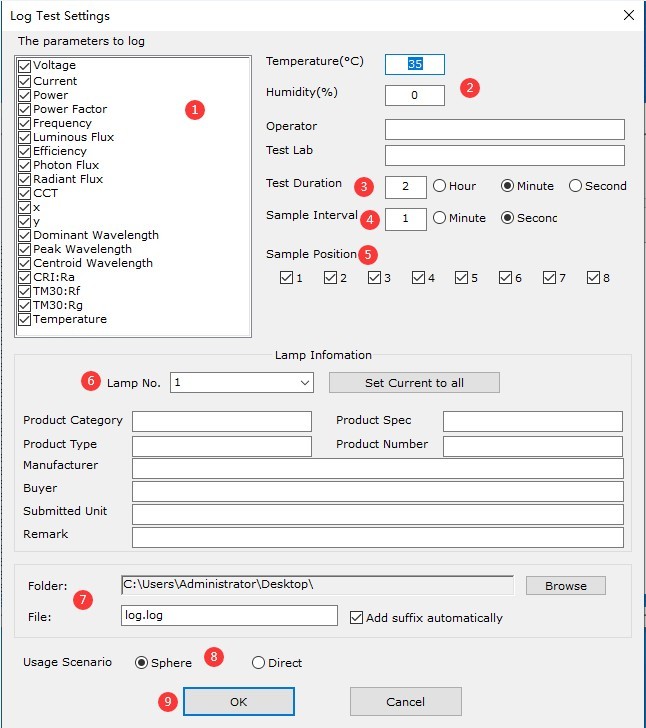
그림 14
5.3.2 Software Monitoring
The software automatically monitors the operating status of all devices and controls the corresponding devices step by step according to the configured parameters to perform log testing. You can check the prompts on the software interface to see which step the aging test system has reached.
Note: If the software encounters an error and cannot continue the test, the test will automatically stop. Please check the prompts on the software interface, resolve the issue, and then restart the test.
5.4 End of Testing
5.4.1 View Test Reports
Once the test is complete, the software will automatically turn off all test specimens, stop the environmental test chamber, and open the test report view screen. You can view, edit, and print the test report.
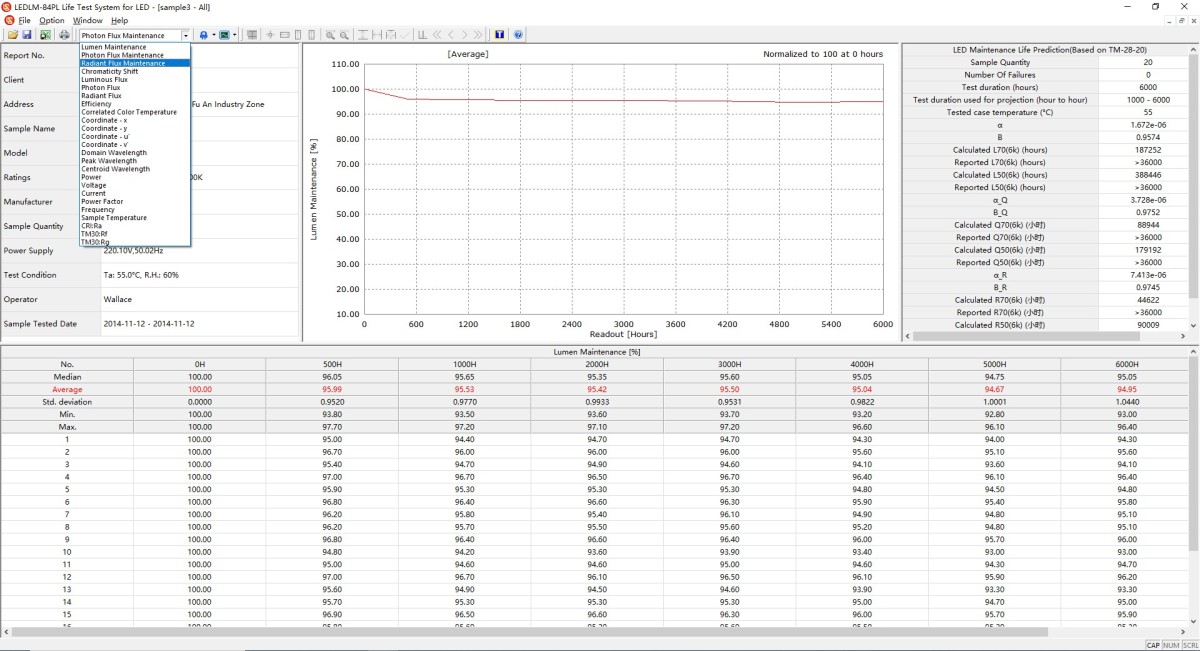
그림 15
5.4.2 Shutting Down the System
Follow these steps to shut down the system: Turn off the power output for the LSP Series/DC Series. Once the environmental test chamber has returned to room temperature, remove all samples, replace them with new samples for the next test, and if no further testing is required, close the software, turn off the power to all equipment one by one, turn off the main power to the cabinet, and close the doors to both the environmental test chamber and the cabinet.
6. 장비의 일상 유지보수 및 관리
6.1 일상적인 유지보수
Before turning on the device, check the interior of the aging chamber for dust or debris and ensure that the internal coating is still intact; check that all connections are secure and that the USB cable and Optical Fiber are free of damage.
6.2 정기 점검
6.2.1 Optical Fiber Cleaning
If the laboratory cannot maintain a dust-free environment, the light-sensitive surface of the Optical Fiber must be cleaned regularly (for example, before each test) based on actual conditions to prevent dust from accumulating and affecting test accuracy.
When cleaning, please use a professional lint-free cloth to remove dust and prevent scratches on the device.
6.2.2 소프트웨어
We will update the software from time to time to add features and fix bugs. If you encounter any issues while using the software, please feel free to contact us at any time to obtain the latest version.
6.3 Long-Term Decommissioning and Maintenance
6.3.1 Equipment Cleaning and Protection
Thoroughly clean all equipment surfaces and cover all equipment with dust-proof cloths; disconnect all power sources.
6.3.2 환경 보호
Ensure that the storage environment is dry and well-ventilated to prevent the equipment from becoming damp. If the ambient humidity is high, keep a dehumidifier on hand.
6.3.3 Monthly Power-On
Power on the system once a month with no load to ensure that all hardware components are functioning properly.
7. 문제 해결 및 일반적인 문제 해결 방법
7.1 통신 오류
Cause of the problem: Check that the communication cable is securely connected; verify that the software and drivers are installed correctly; try a different USB port or communication cable to rule out hardware issues.
Solution: Reinstall the driver, restart the software, and try again.
7.2 The software won’t open or crashes immediately
Cause of the problem: Check whether you are logged in to the computer’s operating system with an administrator account; verify that the software is fully installed; check whether the database files are corrupted.
Solution: Log in to the computer using an administrator account; reinstall the software and drivers.
7.3 정전
7.3.1 DC Power Output Abnormalities
Cause of failure: Sample voltage or current exceeds the DC power supply limits; sample short circuit;
Troubleshooting: Please verify that the sample’s voltage and current are within the DC power supply’s output range. For example, the DC12010 model has a maximum output voltage of 120 V and a maximum output current of 10 A. Check whether the sample is short-circuited; if so, repair the sample before retesting.
7.3.2 No AC Output
Cause of the malfunction: Overload protection triggered;
Troubleshooting Steps: Check the AC power output wiring and sample connections to ensure there are no loose connections or short circuits; if the overload protection is triggered, turn off the power, allow the unit to cool for 5 minutes, and then restart it. Ensure that the sample power remains within the AC power output range; for example, the LSP-1kVARC has a maximum output power of 1000W.