
 영어
영어 中文简体
中文简体 Русский
 Español
 Português
 Türkçe
 العربية
 Deutsch
 Polski
 Italiano
 Français
 한국어
한국어 ไทย
ไทย Tiếng Việt
 日本語
日本語





























유도 조리대 시험 용기
사용자 설명서
적용 할 수있는 LISUN models: LS-B69A、LS-B69B
1. 장비에 대한 기본 이해
1.1 General Overview of the Equipment
1.1.1 Purpose of the Equipment
The LS-B69 Induction Cooktop Test Vessel is a standardized metrological test instrument specifically designed for conducting compliance testing on cooktops for household and similar uses, simulating the operating conditions of everyday cooking vessels. It can be used in accordance with GB/T 4706.14-2024 (IEC 60335-2-9:2019), “Safety of Household and Similar Electrical Appliances—Part 14: Special Requirements for Grills, Toasters, and Similar Portable Cooking Appliances,” GB/T 4706.22-2024 (IEC 60335-2-6:2020)”Safety of Household and Similar Electrical Appliances—Part 22: Particular Requirements for Freestanding Oven Ranges, Cooktops, Ovens, and Similar Appliances,” and has successfully completed all required tests, including heating performance, temperature rise, oil/water temperature stability, and abnormal operation tests.
1.1.2 Applicable Test Scenarios
Temperature rise tests for portable grills and induction cooktops; load tests for freestanding cooktops and oven-range units; tests for rated power and oil/water temperature control accuracy of cooktops; supplementary tests for abnormal operation and durability of cooktops.
1.2 Statement of Compliance with Standards
1.2.1 Compliance with the requirements of IEC 60335-2-9:2019
The equipment fully complies with the terminology definitions in Standard 3.1.9.105 and the structural dimensions shown in Figure 103 and Figure 104. It distinguishes between two types of main structures—aluminum vessels and low-carbon steel vessels—and strictly adheres to mandatory specifications such as vessel material, wall thickness, bottom concavity, and external dimensions.
1.2.2 Compliance with the requirements of IEC 60335-2-6:2020
This standard complies with the requirements for the selection of Induction Cooktop Test Vessels, liquid filling, placement, temperature measurement points, and test environment, and provides a comprehensive test procedure suitable for freestanding electric cooktops, built-in cooktops, and recessed induction cooktops.
1.3 Detailed List of Equipment Components
1.3.1 하드웨어 구성 요소
| LISUN 모델 | LS-69A | LS-B69B |
| 재료 및 구성 | Unpolished commercial-grade 6061 aluminum, flat-bottomed with a lid | Low-carbon steel with a carbon content of 0.08%, without a lid |
| 사용 | For temperature rise tests involving boiling water | For High-Temperature Testing of Cooking Oils |
| 크기 | abc=Ф110×140×8 | dAH = Ф110 × 140 × (2 ± 0.5) |
| abc=Φ145×140×8 | dAH = Φ145 × 140 × (3 ± 0.5) | |
| abc=Ф180×140×9 | dAH = Ф180 × 140 × (3 ± 0.5) | |
| abc=Ф220×120×10 | dAH = Φ220 × 120 × (3 ± 0.5) | |
| abc=Ф300×100×10 | dAH = Φ300 × 100 × (5 ± 0.5) |
1.3.2 전자 문서 다운로드
We have already sent the download links for the digital user manual, calibration certificate, warranty card, and other documents via email at the time of shipment. Please download them as soon as possible. If you have not received the email, please contact us to request the download links again.
2. 안전상의 주의
2.1 General Security Guidelines
2.1.1 Personal Protection Requirements
Wear heat-resistant gloves and safety goggles throughout the entire experiment. Do not touch hot containers, boiling liquids, or the heating surface of the stove with bare hands;
Long hair must be tied back. Scarves, bracelets, and loose-fitting clothing are prohibited to prevent them from getting caught in machinery or causing burns from high temperatures.
2.1.2 Environmental Safety Requirements
The test area must be well ventilated, with the indoor temperature maintained at 23°C ± 2°C and relative humidity between 45% and 75%. It must be kept away from flammable and explosive gases, dust, and organic solvents;
The test bench must be equipped with a high-temperature-resistant, fire-retardant work surface with a load-bearing capacity of at least 20 kg. Testing is prohibited on flammable surfaces such as wood or plastic;
Safety warning signs must be posted in the test area; non-test personnel are prohibited from approaching, and no clutter may be stored within 0.5 m of the perimeter of the test area.
2.2 Safety Precautions Regarding High Temperatures and Liquids
2.2.1 Safety in Water Tests (Aluminum Containers)
Once the water in the container has come to a boil, do not open the lid suddenly to avoid being scalded by hot steam;
When moving containers that are very hot, handle them carefully and avoid splashing water on them.
2.2.2 Safety of Cooking Oil Tests (Low-Carbon Steel Containers)
During cooking oil testing, the oil temperature may reach a maximum of 180°C ± 4°C. Do not add water to hot oil to prevent oil splatter and fire;
In the event of a small oil fire, immediately cover the opening of the container with a fire blanket to cut off the oxygen supply and extinguish the fire; under no circumstances should water be used to extinguish the fire.
3. 장비개요
3.1 Standard Diagram
See Figure 3-1 (taken from the IEC standard).
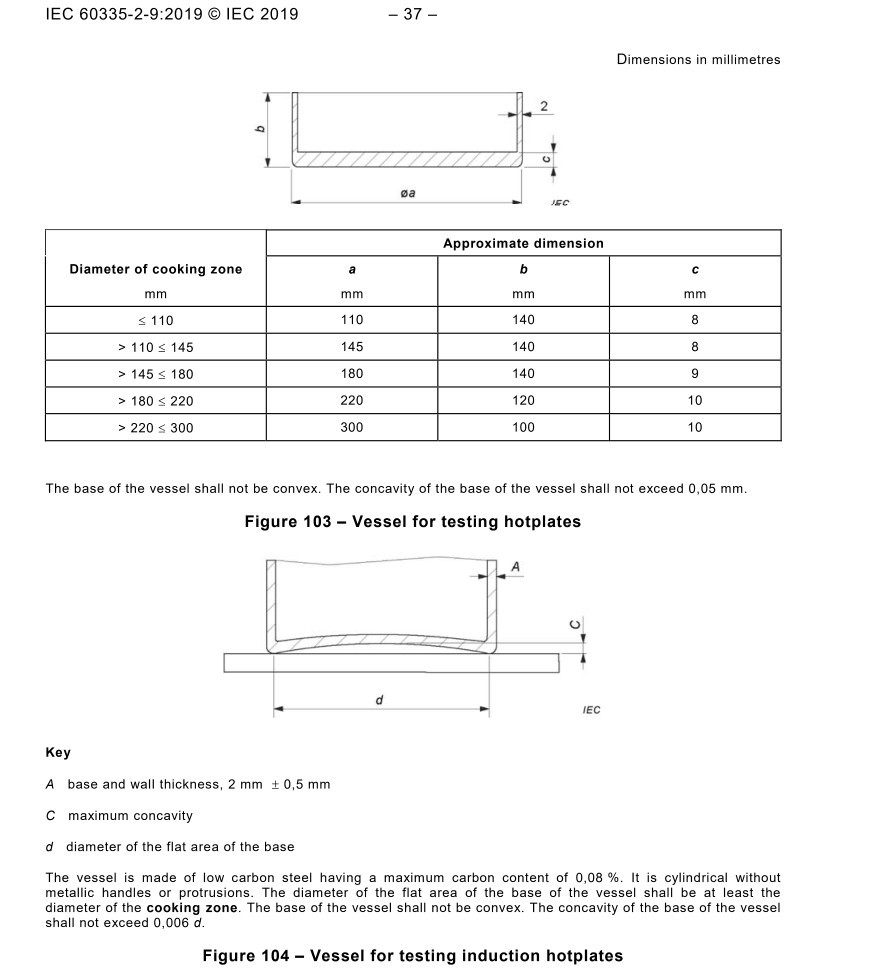
그림 3-1
3.2 Photographs of the Actual Object
3.2.1 LS-69A Aluminum Container
See Figure 3-2, which shows a total of five sizes.
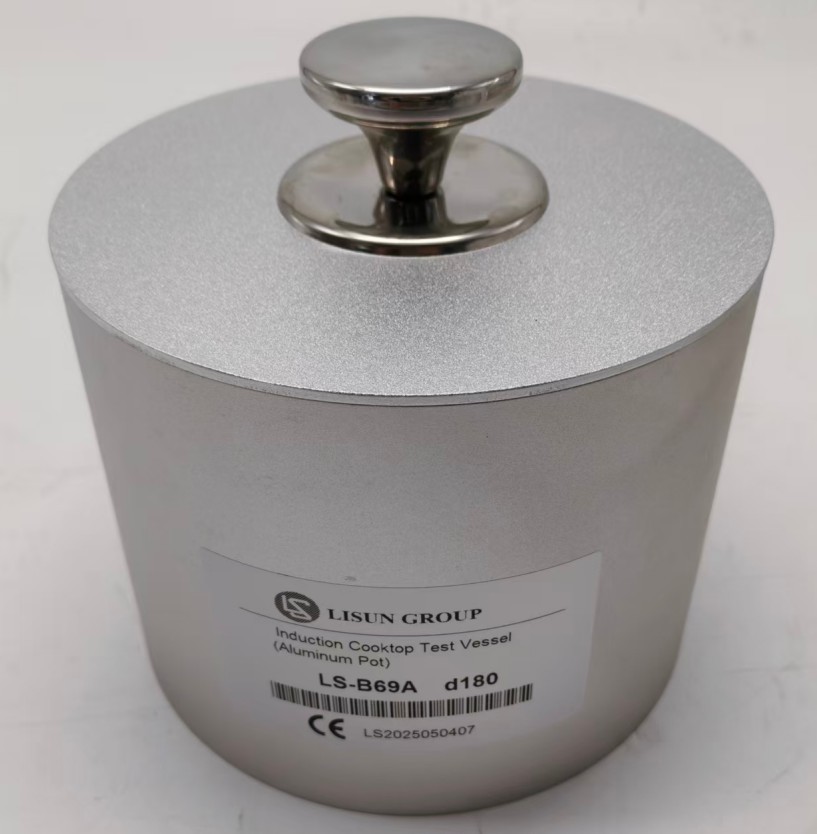
그림 3-2
3.2.2 LS-69B Steel Vessel
See Figure 3-3, which shows a total of five sizes.
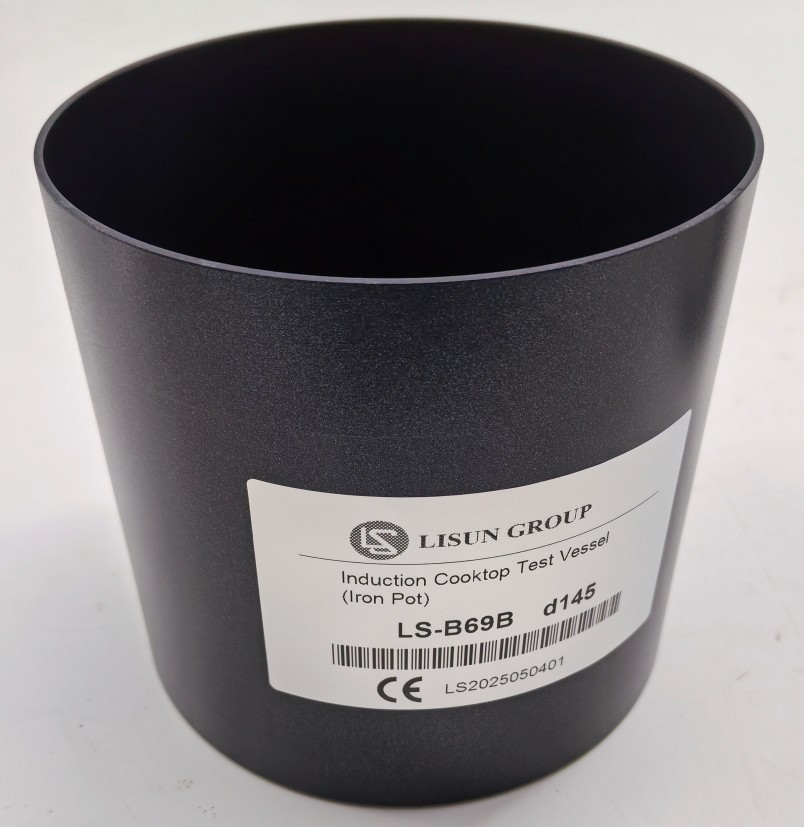
그림 3-3
4. 시험 전 준비 사항
4.1 Environmental and Site Preparation
4.1.1 Calibration of Environmental Parameters
Adjust the laboratory environment 30 minutes in advance: temperature 23°C ± 2°C, relative humidity 45%–75%, no forced convection (air velocity ≤ 0.2 m/s), to prevent air currents from affecting the temperature test results;
Check the ventilation system: During oil-based tests, turn on the exhaust fan to promptly remove oil fumes and maintain good air circulation.
4.1.2 Test Bench Layout
Clear any clutter from the countertop, lay down a heat-resistant, non-slip mat, and place the burner to be tested in the center, ensuring it is level (tilt ≤ 1°);
Allow for working space: Leave a working area of at least 0.3 m around the burner to facilitate refilling liquids, placing containers, and reading data.
4.2 Preliminary Inspection of the Stove Under Test
4.2.1 육안 및 구조 검사
Check the cooking surface, control panel, and power cord to ensure they are in good condition and free of cracks, warping, or damage;
Clean dust, grease, and food residue from the heating surface of the stove to ensure it is clean and free of protruding foreign objects.
4.2.2 Preliminary Inspection of Electrical Performance
Plug in the cooktop, let it run unloaded for 5 minutes, and check that the buttons, control knobs, and indicator lights are functioning properly;
Check the burner for leakage current; under normal operating conditions, the leakage current must be ≤0.75 mA. If it does not meet this standard, testing must not be conducted.
4.3 Inspection and Pretreatment of Test Containers
New containers / Long-term storage containers: Clean the inner walls and bottom with clean water and a soft brush to remove rust-preventive oil and dust;
Reusing Containers: Remove limescale and residual grease from the inner walls. Never use steel wool or strong acidic or alkaline cleaners (as they may scratch the container and alter its heat conductivity);
After washing, turn the container upside down and allow it to air-dry completely (until there are no water droplets remaining on the inner walls) to prevent dilution of the test liquid or uneven heating.
4.4 Preparation of Test Media and Auxiliary Tools
4.4.1 Preparation of the Test Medium
Test medium for distilled water: Use distilled water at room temperature (23°C ± 2°C); do not use tap water (scale deposits affect heat transfer).
Test medium for cooking oil: Use standard cooking oil designated for testing; store it at room temperature; fill it to the standard volume; and set the target oil temperature to 180°C ± 4°C.
The dimensions of the containers used for dispensing must strictly adhere to the specifications in the table below.
| Dimensions of the cooking area (mm) | Water or Oil Volume (L) | Using Container Dimensions |
| Size ≤ 110 | 0.6 | d110 |
| 110 < Dimensions ≤ 145 | 1.0 | d145 |
| 145 < Dimensions ≤ 180 | 1.5 | d180 |
| 180 < size ≤ 220 | 2.0 | d220 |
| 220 < Dimensions ≤ 300 | 3.0 | d300 |
4.4.2 Preparing Auxiliary Tools
Calibrate the temperature measurement equipment (Type K thermocouple) in advance to ensure an accuracy of ±0.5°C, install a positioning scale, and secure it to the standard temperature measurement point;
Prepare a timer, a test log sheet, and a pen to record data such as test time, temperature, and settings;
Make sure to have all necessary safety equipment on hand, including heat-resistant gloves, safety goggles, fire blankets, and other protective gear.
5. 테스트 절차
This section is divided into three standard test procedures: the boiling water test, the cooking oil constant-temperature test (using a low-carbon steel container, as shown in Figure 102 of GB/T 4706.14-2024), and the comprehensive test for freestanding stoves. Operators should select the appropriate procedure as needed.
5.1 General Basic Operating Procedures
5.1.1 Container Placement Guidelines
Gently place the pre-treated container exactly in the center of the cooking zone of the test burner, ensuring that the bottom of the container is in full contact with the burner’s heating surface, with no offset or gaps;
After placing the container, gently press down on the top to ensure it does not wobble. If additional stabilization is needed, use a heat-resistant, non-slip mat to secure it in place.
5.1.2 Installation of Temperature Sensors
Secure the thermocouple probe to the bottom of the container, 10 mm above the center, using the positioning scale. Ensure the probe is fully immersed in the test medium and does not touch the container walls or bottom to ensure accurate temperature measurement.
5.1.3 Basic Settings for Test Modes
The controller of the test cooktop is initially set to the highest setting (this applies uniformly to all standards unless otherwise specified), and the setting is adjusted as required by the standard during the test.
5.2 Boiling Water Test
5.2.1 Media Filling
Fill the aluminum container with distilled water at room temperature to the standard volume, and once filled, cover it with the matching lid (seal it);
5.2.2 Start-up Test and Temperature Rise Monitoring
Put on protective gear, turn on the stove, set it to the highest setting, and start the timer at the same time;
Monitor changes in water temperature in real time, record the rate of temperature increase and the temperature at each time point, and observe the burner’s operating condition (check for unusual noises or abnormal heat).
5.2.3 Steady-State Observations During Boiling
When the water in the container continues to boil (with the entire surface bubbling vigorously) and reaches a steady state, continue observing for 30 minutes;
Record the temperature rise on the cooktop surface, cooktop power, and other parameters as required by the standard to verify whether they fall within the temperature rise limits specified in the standard.
5.3 Constant-Temperature Test for Cooking Oil
5.3.1 Filling with Hydraulic Fluid
Pour standard test cooking oil into a low-carbon steel container; do not cover it with a lid;
Install the temperature sensor and ensure that it is submerged in the oil (with the bottom 10 mm above the oil level) and positioned away from the container wall.
5.3.2 Heat to the target temperature
Turn the stove to the highest setting, begin heating, and monitor the oil temperature in real time;
When the oil temperature reaches 180°C ± 4°C, immediately adjust the burner control to maintain a constant oil temperature within that range.
5.3.3 Continuous Test at Constant Temperature
Operate continuously for 60 minutes under steady-state conditions, recording the oil temperature, burner power, and surface temperature every 5 minutes;
Monitor the condition of the oil and the heating status of the burner throughout the entire process. If the oil begins to smoke heavily or the burner becomes abnormally hot, stop the test immediately.
5.3.4 Abnormal Operating Conditions Testing
Simulate abnormal operating conditions, such as brief power outages and accidental adjustment of settings, to observe whether the burner safety devices (overheat protection, power-off protection) operate properly, and record the activation temperatures and response times.
5.4 Comprehensive Testing of Freestanding Stoves
5.4.1 Multi-head Synchronization Test
For multi-burner freestanding stoves, match the LS-B69 cookware to the size of each cooking zone;
Fill all containers with the test medium simultaneously, arrange them in a uniform manner, and start the burners at the same time.
5.4.2 Interlocking of Temperature Rise and Electrical Tests
Once the test has reached a steady-state condition (no change in temperature for 10 consecutive minutes), use a surface temperature measuring device to check the temperature of the stove’s accessible surfaces to determine whether they comply with the surface temperature limits specified in the standard;
Leakage current and dielectric strength tests were conducted intermittently throughout the test to verify the electrical safety performance of the device.
5.4.3 Stability Auxiliary Test
After the test loading is complete, conduct a tilt stability test on the stove in accordance with the standard requirements; the test is considered passed if the container does not tip over and no significant amount of liquid spills out.
5.5 Emergency Procedures During Testing
5.5.1 Emergency Response to Liquid Spills
Immediately turn off the power to the burner, wait for the container to cool down, clean up any spilled fluid, check whether water has entered the burner’s electrical components, and only restart the test after the burner has dried completely.
5.5.2 Emergency Response to Hydraulic Fluid Fires
Quickly cover the fire with a fire blanket or the lid of a pot to extinguish it, turn off the power, and do not spray water on the fire. After the fire is extinguished, let it cool on its own.
5.5.3 Emergency Procedures for Unusual Noises or Odors from Equipment
Immediately shut off the main power supply, stop the test, and troubleshoot any malfunctions in the container or burner. Do not use the appliance again until the malfunction has been resolved.
6. 테스트 후 절차
6.1 Test Termination and Power Shutdown Procedures
6.1.1 Normal Termination of the Test
Once the test duration has reached the required time and data recording is complete, first set the burner to the lowest setting, then turn off the burner’s power, and finally disconnect the main power supply;
Wait for the stove and the container to cool down naturally; never move the container while it is still hot.
6.1.2 Abnormal Test Termination
In the event of a fire, electrical leakage, equipment deformation, or other abnormalities, immediately shut off the main power supply, initiate emergency procedures, and investigate the cause of the malfunction only after the scene has been secured.
6.2 Recovery and Treatment of Test Media
6.2.1 Treatment of Clean Water Media
After the container has cooled to room temperature (≤40°C), slowly pour out the remaining distilled water into the designated waste container; if the water is clear and free of impurities, it may be reused for preliminary cleaning of the equipment.
6.2.2 Treatment of Cooking Oil Media
High-temperature oil must be allowed to cool naturally to room temperature. Pour it into a waste oil collection container using a dedicated oil transfer tube, and store it according to category. Do not pour it out indiscriminately under any circumstances. Reusable test oil should be filtered to remove impurities and stored in a sealed container, with the number of uses clearly marked. It is recommended that the oil be reused no more than 8 times in total; once this limit is reached, replace all of it with new oil.
6.3 Container Disassembly, Cleaning, and Drying
6.3.1 Container Disassembly
Once cooling is complete, carefully remove the container, lid, temperature probe, and other items, and place them in their respective categories in the clean area.
6.3.2 즉각적인 세척
Aluminum containers: Use clean water and a soft brush to clean limescale from the inner walls and bottom; pay special attention to cleaning the seal groove on the lid;
Low-carbon steel containers: First, wipe off any residual oil with a dry, soft cloth, then wash with warm water and a neutral detergent to remove oil stains;
Accessories: Clean the temperature probe, measuring ruler, and non-slip mat one by one to remove any residual medium.
6.3.3 Thorough Drying
Place all cleaned containers and accessories upside down in a well-ventilated area to air dry. Do not store them until you have confirmed that there are no water or oil stains remaining, to prevent carbon steel containers from rusting and aluminum containers from oxidizing.
7. 장비의 일상 유지보수 및 관리
7.1 Daily Inspections
Inspect the container body for any new scratches, dents, or deformations, and check whether the bottom is warped;
For aluminum vessels, check the lid’s sealing surface for deformation or damage; for low-carbon steel vessels, check the bottom for rust spots.
7.2 주간 유지보수
Rust Prevention: Apply a thin coat of food-grade rust-preventive oil to the inner walls and bottom of low-carbon steel containers (when not in use for an extended period); wash thoroughly before reuse. Aluminum containers do not require oiling; simply keep them dry.
7.3 장기 보관 및 유지 관리
After cleaning and maintenance are complete, store the lid and container separately to prevent the sealing surfaces from sticking together. Store them in dust-proof covers and place them in a warehouse that is dry, protected from light, and free of corrosive gases, with an ambient temperature of 10°C to 30°C and a relative humidity of ≤60%.
Do not place heavy objects on top of the container to prevent deformation due to pressure.
7.4 Calibration Interval Requirements
To ensure the measurement accuracy and operational reliability of the container, it is recommended that it be sent periodically to a qualified third-party metrology organization for calibration. The recommended calibration interval is 12 months. Users may determine the specific calibration interval based on frequency of use, environmental conditions, and quality system requirements.
8. 문제 해결 및 일반적인 문제 해결 방법
| 결함 증상 | 가능한 원인들 | 순서 |
| The pot is wobbling and hanging in the air on the stove, and does not sit flush against the heating surface. | A hot container is suddenly exposed to cold water; pressure or impact during handling or storage; prolonged exposure to high temperatures on one side only | Minor deformation: Correct at room temperature using a specialized correction tool; after correction, remeasure the dimensions; if they meet specifications, the item may continue to be used. Severe deformation (bottom concavity exceeds standard tolerances): Scrap immediately; do not use for standard testing. |
| Yellow or brown rust spots appear on the inner walls and bottom of the container; when heated, the rust flakes off and contaminates the test medium. | Stored without being thoroughly dried after cleaning; humidity in the storage area exceeded the standard; long-term buildup of oil stains and water marks | Minor rust spots: Wipe with a soft cloth and a neutral rust remover, then clean, dry, and apply rust-preventive oil; use only after re-inspection confirms dimensions are within specifications. Extensive rust or penetrating rust spots: Scrap immediately; |
| During the water test, there was a significant steam leak, the heating rate was slow, and the test data was distorted. | Aluminum containers or pot lids are warped, and there is dirt on the sealing surface | Clean dirt from the sealing surface; manually correct minor deformations; replace the container or lid if the deformation is severe. |