
 영어
영어 中文简体
中文简体 Русский
 Español
 Português
 Türkçe
 العربية
 Deutsch
 Polski
 Italiano
 Français
 한국어
한국어 ไทย
ไทย Tiếng Việt
 日本語
日本語





























볼 압력 테스트 장치
사용자 설명서
적용 할 수있는 LISUN 모델: ZBP-T
1. 제품 개봉 및 기본 사용법 익히기
1.1 주요 기술 사양
| LISUN 모델 | ZBP-T |
| Steel Ball Diameter/Radius | 5 mm / 2.5 mm |
| Pressurization Assembly | 20N ± 0.2N |
| 표본 홀더 | A solid steel cylinder with a diameter of 50 mm and a length of 100 mm |
| 소스 | All components feature an electroplated finish on the steel surfaces. |
1.2 Unboxing and Inspection
When unpacking the equipment, handle it gently to avoid scratching the exterior casing with sharp tools. After unpacking, first inspect the exterior of the main unit to ensure there is no visible deformation or dents. If you discover any damage or deformation to the equipment or accessories, please contact us immediately.
1.3 Equipment Overview
The Ball Pressure Test Device looks like this:
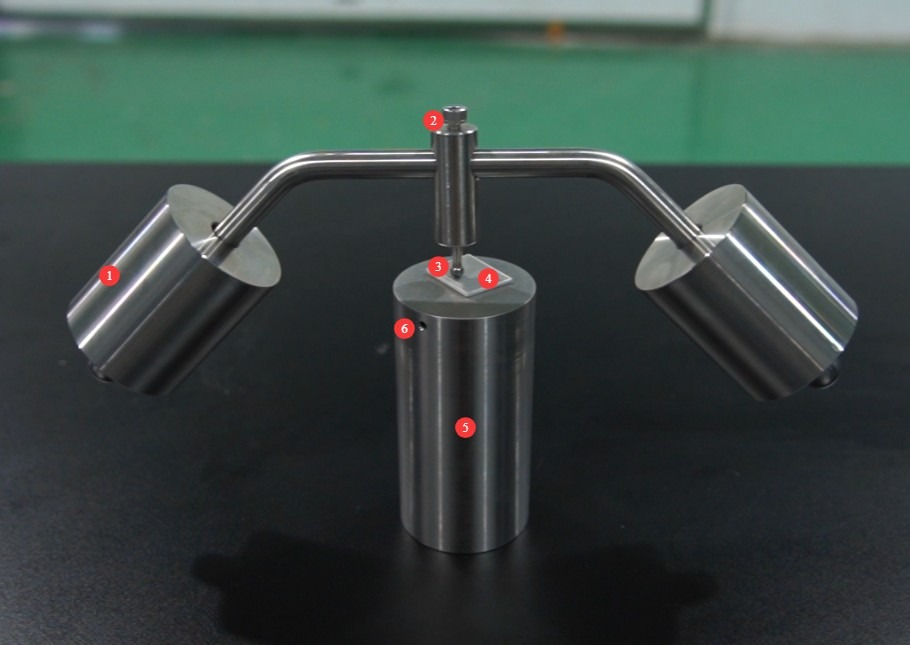
그림 1
① Pressure-applying assembly: Provides a standard pressure of 20 N (equivalent to a mass of 2041 g); ② Leveling mechanism: Used to adjust the device to a level position;③ Pressure-Applying Steel Ball: Made of corrosion- and wear-resistant stainless steel to ensure surface finish and dimensional accuracy; ④ Sample Placement Area; ⑤ Sample Holder: Holds the sample and must be in direct contact with it to ensure test stability; ⑥ Thermocouple Jack: Used to monitor the test environment; the thermocouple must be provided by the user.
Note: The ball compression test requires the use of a GW-225 high-temperature chamber.
2. 사용상의 주의
When placing and removing the test apparatus, handle it gently to prevent the steel balls from colliding and becoming damaged, which could affect the accuracy of the test.
When applying pressure, ensure that the surface of the test specimen is level to prevent pressure shifts from distorting the test results.
When performing operations involving the high-temperature chamber, operators must take precautions against high temperatures by wearing heat-resistant gloves, safety goggles, and heat-resistant protective clothing.
3. 시험 전 준비 사항
3.1 샘플 준비
The sample material is a non-metallic material for which heat deflection resistance is to be evaluated, and it complies with the specifications for test specimens set forth in the relevant standard (e.g., insulating material components as specified in Clause 25.3 of GB/T 2099.1-2021).
Sample thickness: Preferably, ensure that the thickness of a single piece is ≥2.5 mm; If this cannot be met, test specimens may be stacked in layers of no more than four, with a total thickness of ≥2.5 mm; if this is still not feasible, cut small test specimens with a thickness of ≥2 mm from new test specimens after aging (in accordance with Clause 21.3 of GB 16915.1-2020).
The surface of the sample must be clean and dry, free of oil, scratches, damage, or other defects, to ensure that the test is not compromised.
3.2 Balancing Adjustment of the Ball Pressure Device
Adjusting Balance in All Directions: Place the sample holder on a level surface and position the loading assembly on top of it so that the steel ball contacts the holder. If the loading assembly is unbalanced, loosen the nut on the balancing adjustment mechanism. Adjust the loading assembly until it is balanced in all directions (front-to-back and left-to-right), then tighten the nut.
3.3 Verification of Test Environment Conditions
3.3.1 Verification of High-Temperature Chamber Parameters
Set the temperature in accordance with the requirements of the test standards (such as 75°C and 125°C as specified in Clause 13.2.1 of GB/T 7000.1-2023,155°C ± 2°C as specified in Clause 24.1 of GB/T 17465.1-2022, etc.), and ensure that the temperature uniformity inside the high-temperature chamber meets the ±2°C requirement.
3.3.2 Preparation of Cooling Conditions
Prepare cold water at approximately room temperature (about 25°C) to cool the samples after testing.
3.3.3 Preparation of Measurement Tools
Check the accuracy of the caliper or micrometer to ensure that its measurement range is sufficient for measuring indentation diameters (≤2 mm).
4. Ball Compression Test Procedure
4.1 Preheating the Test Setup
Place the entire Ball Pressure Test Device, after adjusting its balance, onto the platform of the high-temperature chamber at the preset temperature, ensuring that both the sample support on the chamber platform and the entire Ball Pressure Test Device are level. Start the high-temperature chamber and allow it to preheat for a sufficient period of time (at least 30 minutes) to ensure that the entire Ball Pressure Test Device reaches a stable test temperature (in accordance with Clause 21.3 of GB 16915.1-2020).
4.2 샘플 배치
Operators must take precautions against high temperatures! Remove the Ball Pressure Test Device from the high-temperature chamber and place it in a safe area outside the chamber. Immediately place the prepared test specimen on the support, ensuring that the specimen is in direct contact with the support and that its surface is horizontal.
If the sample surface is curved, additional support must be provided at the areas bearing the ball pressure to ensure that the pressure is applied uniformly (in accordance with GB/T 7000.1-2023, Section 13.2.1).
4.3 Pressurization Operations
Align the steel ball of the pressure-applying device with the center of the sample’s test surface, gently place it on the sample, ensure that the steel ball makes perpendicular contact with the sample surface, and apply a force of 20 N using the device’s own weight (no additional external force is required).
Operators must take precautions against high temperatures! Immediately return the Ball Pressure Test Device containing the sample to the high-temperature chamber, close the chamber door, and start the timer; the test duration is 1 hour.
4.4 Monitoring the Test Process
During the test, periodically monitor the temperature display on the high-temperature chamber to ensure that the temperature remains within the set range (fluctuations ≤ ±2°C).
Do not open the door of the high-temperature chamber during the test to prevent sudden temperature changes from affecting the test results.
4.5 Sample Cooling and Handling
Operators must take precautions against high temperatures! Once the test has lasted for 1 hour, quickly open the high-temperature chamber door, remove the test setup and the sample, and immediately disconnect the pressurization device from the sample.
Immerse the sample in prepared cold water for 10 seconds to cool it to near room temperature (approximately 25°C), taking care to avoid any impact or compression during the cooling process (in accordance with GB/T 2099.1-2021, Clause 25.3).
4.6 Indentation Measurement and Evaluation of Results
Remove the cooled sample and wipe its surface with a clean, soft cloth to ensure that the indentation area is free of moisture and stains.
Measure the maximum diameter of the indentation using a calibrated caliper or micrometer. When taking the measurement, align the instrument precisely with the center of the indentation. Repeat the measurement three times and use the average value as the final indentation diameter.
Results Evaluation: If the indentation diameter is ≤ 2 mm, the sample is deemed acceptable; if the indentation diameter is > 2 mm, the sample is deemed unacceptable. Record the measurement data and the evaluation results.
5. 장비의 일상 유지보수 및 관리
5.1 일일 청소
5.1.1 일일 청소
After the test is complete, wipe down all components of the Ball Pressure Test Device with a dry, clean, soft cloth to remove dust, oil, stains, and sample residue from the surfaces.
5.1.2 Regular Deep Cleaning
Perform a thorough cleaning once a week: Remove detachable parts such as the balance adjustment nut and the pressurization assembly, use a brush to clean dust and debris from the threads, and apply a small amount of rust-preventative oil after cleaning (avoid using too much, as this may interfere with the adjustment function).
5.2 장기 보관 및 유지 관리
If the equipment will not be used for an extended period (more than one month), all components must be thoroughly cleaned; the steel balls should be coated with rust-preventative oil and stored in a sealed container; and the entire test apparatus should be placed in a dry, well-ventilated environment to prevent moisture and corrosion.
6. 문제 해결 및 일반적인 문제 해결 방법
6.1 Equipment Balancing and Adjustment Malfunctions
6.1.1 Symptoms of the Malfunction
Even after adjusting the leveling nuts, the unit remains tilted and cannot be leveled.
6.1.2 Troubleshooting and Resolution
Check to see if the surface on which the unit is placed is level. If the floor is sloped, replace the work surface with a level one.
Check whether the balancing adjustment nut is damaged (e.g., stripped threads). If it is damaged, contact the manufacturer to have the nut replaced.
Check the steel ball surface for deformation; if deformation is found, replace the part.
6.2 Faults Causing Abnormal Indentation Measurement Results
6.2.1 Symptoms of the Malfunction
The indentation diameter is significantly larger or smaller than expected and does not match the expected results.
6.2.2 Troubleshooting and Resolution
Check the surface of the steel balls for wear or deformation; if any problems are found, replace them with qualified steel balls and repeat the test.
Verify that the test temperature meets the standard requirements. If the temperature deviation is too great, adjust the temperature of the high-temperature chamber and retest.
Check whether the sample is positioned level and whether the pressure is applied vertically; if there is any deviation, correct the procedure.
Check whether the measuring instruments are calibrated. If the instruments are not accurate enough, replace them with calibrated ones and take the measurements again.